การเรียกใช้งาน Web Services ใน Visual Studio 2017

winform call web services

สร้างโปรเจ็กส์

File > New > Project…
เลือกโปรเจ็กส์แบบ Windows Classic Desktop > Windows Forms App (.NET Framework)
ตั้งชื่อโปรเจ็กส์ JackWinForm

เพิ่ม Web Services References

คลิกขวาที่ References > Add Service References…
ใส่ url ของ Web Services เช่น http://localhost:62668/MyWebService.asmx กด Go
เลือก MyWebService > MyWebServiceSoap
ตั้งชื่อ MyServiceReference

Continue reading

การสร้าง Web Services ใน Visual Studio 2017

Web Services

สร้างโปรเจ็กส์

File > New > Project…
เลือกโปรเจ็กส์แบบ Web > ASP.NET Web Application (.NET Framework)
ตั้งชื่อโปรเจ็กส์ JackWebServices
เลือก Empty

เพิ่มไฟล์ Web Services

คลิกขวาที่ JackWebServices เลือก Add > New Item…
เลือก Web Services (ASMX)
ตั้งชื่อไฟล์ MyWebService.asmx

Continue reading

การสร้าง Web Services และเรียกใช้งาน Web Services ด้วย Visual Studio 2015

สร้าง 2 โปรเจ็กส์

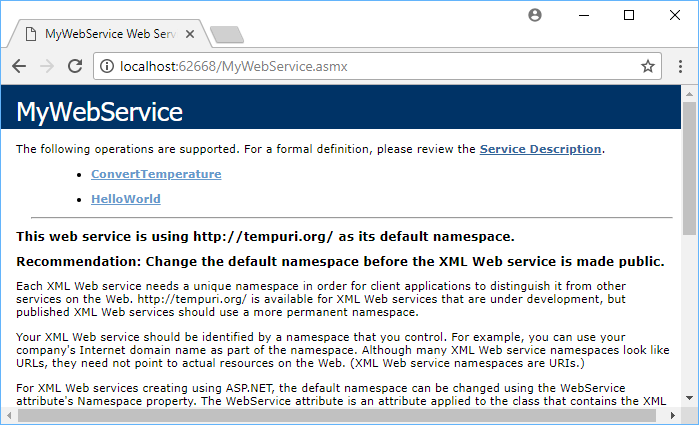
โปรเจ็กส์ 1: สร้างโปรเจ็กส์ให้บริการเว็บเซอร์วิส มีเว็บเมธอดให้บริการ 2 เมธอด

  • มีเว็บเมธอด HelloWorld() คืนค่าเป็นสตริง Hello World
  • มีเว็บเมธอด ConvertTemperature() รับพารามิเตอร์เป็นองศาฟาเรนไฮ และคืนค่าเป็นองศาเซลเซียส
  • สามารถเรียกดู WSDL ได้ด้วยการใส่ ?wsdl ต่อท้าย เช่น  xxx.asmx?wsdl

โปรเจ็กส์ 2: สร้างโปรเจ็กส์วินโดว์เดสท็อป เรียกใช้งานเว็บเซอร์วิส

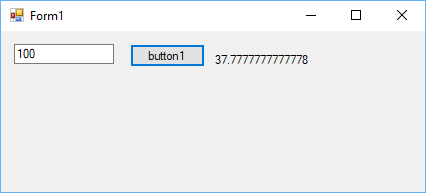
  • เรียกใช้งานเว็บเมธอด ConvertTemperature()

Visual Studio 2017

ถ้าใช้ Visual Studio 2017 ให้เพิ่ม Tag ต่อไปนีั้ที่  web.config

Ref stackoverflow.com – Request format is unrecognized for URL unexpectedly ending in

Visual Studio Tools for Office เขียน VBA Excel ด้วย C# สำหรับ .NET programmer

VBA Excel ด้วย C# สำหรับ .NET programmer

สิ่งที่ต้องมีสำหรับการพัฒนา Excel Programming ด้วย C#

Visual Studio ที่ได้ติดตั้ง visual studio tool for office  ซึ่งจะให้เราสามารถสร้าง Microsof Office Project ได้จาก Visual Studio

vto 2005 sp1

vto 3

เครื่องคอมพิวเตอร์ที่ใช้งานได้ทำการติดตั้ง Microsoft Excel 2003 และทำการ update เป็น Service Pack 1

เมื่อได้ติดตั้งทุกอย่างเรียบร้อยแล้วก็เริ่มลงมือเขียน program กันได้เลยครับ

สร้าง project ใหม่

เริ่มเขียนคำสั่งในรูปแบบ code behine คล้ายๆ กับ Windows Form หรือ Web Form

run แบบไม่ต้อง debug ด้วยการกดปุ่ม ctrl + f5 workbook Microsoft Excel จะเปิดขึ้นมาและเรียกใช้งาน work book ที่เราได้เขียนคำสั่งไว้

ได้ผลลัพธ์ตามที่เราต้องการ

เปรียบเทียบกับการใช้งานกับการเขียนด้วย VB Script (VBA)

นี้เป็นความเห็นส่วนตัวของผมเองนะครับ

โดยส่วนตัวในแง่ของการเขียนคำสั่ง ชอบวิธีการของ Visual Studio For Office มากกว่า เพราะสามารถเขียนด้วยภาษา C# ซึ่งเป็นภาษาโปรดของผม และยังได้ความสามารถต่างของ Visual Studio มาช่วยในการเขียน program ได้ง่ายขึ้น เช่น intellisence หรือ auto complete อีกทั้ง c# ก็มี compiler ที่ฉลาดแสดงผลความผิดพลาดที่อ่านได้เข้าใจง่าย

แต่สิ่งที่การเขียนด้วย VBA ได้เปรียบกว่าคือ

เปิด workbook แล้วเรียกใช้คำสั่งที่เขียนเพิ่มเข้าไปได้เร็วกว่าวิธีของ VTO

copy ไปใช้ต่อได้ทันที่ ไม่ต้องทำการเปิด permission ให้กับ dll ที่ได้จากวิธีการของ vto

การพัฒนาหรือแก้ไขไม่จำเป็นต้องมี visual studio แค่เปิด file ด้วย excel ก็สามารถแก้ไขงานได้ทันที

หากต้องเลือกวิธีการใดวิธีการหนึ่งก็ trade off กันแล้วกันนะครับ

สำหรับคนที่เป็น VB อยู่แล้วก็อาจจะเลือก VBA

แต่สำหรับที่เป็น C# เขียน Excel programming ก็เป็นทางเลือกที่น่าสนใจ

tip

สำหรับผมคิดว่าสิ่งที่ยากที่สุดที่เจอในการเขียนก็คือ ขั้นตอนของการสร้าง project เพราะได้หาวิธีการแก้ไขหลายอย่างจนกว่าจะสร้าง project ใหม่ได้ จึงขอเขียนคำแนะนำเพิ่มเติมคือ

หากสร้าง project ไม่ได้

ให้ดูว่าเราได้ update office 2003 เป็น SP1 ยัง

ติดตั้ง VTO 2005 และ VTO 3 ยัง

หากยังสร้าง project ไม่ได้แนะนำให้ uninstall vto ทั้งสองตัวออกและติดตั้งใหม่

Ref: codesanook.com


สร้าง MSDN style document (.chm) จาก XML comment ง่าย ๆ ด้วย NAnt และ NDoc Task

คัดลอกมาจาก: codesanook.com

ในภาษา C# เราสามารถที่จะทำการ Comment เนื้อหาบางส่วนของโปรแกรม เพื่อไม่ให้ compiler นำไปแปลความหมาย ซึ่งจะมีประโยชน์ดังนี้

  • เขียนคำอธิบายการทำงานของคำสั่งที่เขียนขึ้น
  • เก็บส่วนที่ยังทำงานไม่ได้หรือยังไม่สมบูรณ์ไว้ โดยไม่ให้ compiler นำไปแปลความหมาย

ลักษณะการ Comment ของ C# แบ่งได้เป็น

  • Single Line Comment  Ex.
    // this is comment
  • Block Comment Ex.
    /*this is block
    comment */
  • XML Comment  Ex.
         /// <summary>
        /// This is comment.
        /// </summary>
จุดที่น่าสนใจก็คือ หากเรา comment class, property หรือ method ในแบบ XML เราสามารถใช้ NDoc สร้าง document file ในรูปแบบ MSDN-style HTML Help (.chm) ขึ้นมาได้ สำหรับเป็นคู่มืออธิบายการใช้งาน (help file) ของคลาสหรือคำสั่งอื่นๆ ภายในโปรแกรม  ช่วยให้นักพัฒนาโปรแกรม (developer) คนอื่นในทีมเข้าใจการใช้งานคลาสที่เราเขียนขึ้น และนำไปใช้งานต่อได้
ขั้นตอนการสร้าง XML document file
  • สร้าง comment อธิบายคลาส, พรอพเพอร์ตี และเมธอดที่เราได้สร้างขึ้น
    01 /// <summary>
    02    /// main class of program
    03    /// </summary>
    04    class Program
    05    {
    06        /// <summary>
    07        /// entry point of application and print message "Hello World" to screen
    08        /// </summary>
    09        ///<param name="args">command line arguments
    10        static void Main(string[] args)
    11        {
    12            Console.WriteLine("Hello World");
    13        }
    14    }      
  • ติดตั้ง NAnt และสร้าง build file ขึ้นมาให้ชื่อว่า ndoc.build ใน ndoc.build เขียนมี script ของ ndoc task ดังนี้
    01 <!--?xml version="1.0" encoding="utf-8" ?-->
    02 <project name="ndoc">
    03     
    04     <ndoc>
    05         
    06         <assemblies basedir="NDocTaskDemo\bin\Debug">
    07             <include name="NDocTaskDemo.exe">
    08         </include></assemblies>
    09         
    10         <summaries>
    11             <include name="NDocTaskDemo.xml">
    12         </include></summaries>
    13
    14         <documenters>
    15             <documenter name="MSDN">
    16
    17                 <property name="OutputDirectory" value="documents">
    18
    19                 <property name="HtmlHelpName" value="NDocTaskDemo">
    20
    21                 <property name="ShowMissingSummaries" value="True">
    22
    23                 <property name="HtmlHelpCompilerFilename"value="hhc.exe">
    24
    25                 <property name="IncludeFavorites" value="False">
    26
    27                 <property name="Title" value="MySystem (NDoc)">
    28
    29                 <property name="SplitTOCs" value="False">
    30
    31                 <property name="DefaulTOC" value="">
    32
    33                 <property name="ShowVisualBasic" value="False">
    34
    35                 <property name="ShowMissingSummaries" value="True">
    36
    37                 <property name="ShowMissingRemarks" value="False">
    38
    39                 <property name="ShowMissingParams" value="True">
    40
    41                 <property name="ShowMissingReturns" value="True">
    42
    43                 <property name="ShowMissingValues" value="True">
    44
    45                 <property name="DocumentInternals" value="True">
    46
    47                 <property name="DocumentProtected" value="True">
    48
    49                 <property name="DocumentPrivates" value="True">
    50
    51                 <property name="DocumentEmptyNamespaces"value="False">
    52
    53                 <property name="IncludeAssemblyVersion"value="True">
    54
    55                 <property name="CopyrightText" value="Copyright - CodeSanook.com">
    56
    57                 <property name="CopyrightHref"value="http://www.codesanook.com">
    58              </documenter>
    59         </documenters>
    60
    61     </ndoc>
    62     
    63 </project>


  • เปิด command prompt ในตำแหน่งที่เก็บ project.build เรียกใช้งาน build file นี้ด้วยคำสั่ง nant จะมีผลลัพธ์แสดงที่หน้าจอดังนี้
    G:\blogging content\ndoc\NDocTaskDemo>nant
    NAnt 0.91 (Build 0.91.3801.0; alpha1; 5/29/2010)
    Copyright (C) 2001-2010 Gerry Shaw
    http://nant.sourceforge.net
    Buildfile: file:///G:/blogging content/ndoc/NDocTaskDemo/NDoc.build
    Target framework: Microsoft .NET Framework 4.0
         [ndoc] Initializing…
         [ndoc] Merging XML documentation…
         [ndoc] Building file mapping…
         [ndoc] Loading XSLT files…
         [ndoc] Generating HTML pages…
         [ndoc] Generating HTML content file…
         [ndoc] Compiling HTML Help file…
         [ndoc] Done.
    BUILD SUCCEEDED
    Total time: 7.9 seconds.
    G:\blogging content\ndoc\NDocTaskDemo>
  • เข้าไปใน folder ที่กำหนดไว้ให้สร้าง XML document file ขึ้นมา จะมี file ชื่อ NDocTaskDemo.chm
  • เปิด NDocTaskDemo.chm ขึ้นมา จะมีคำอธิบาย class และ method ที่เราได้เขียน comement ไว้


Using WIA for scanning

I was playing around this morning with scanning images and put together an adapter class that uses the Windows automation library (WIAAUT.DLL) which is part of the WIA automation SDK — WIA means Windows Image Acquisition.

Here are the imports I used for the code file:


using System;
using System.Drawing;
using System.Drawing.Imaging;
using System.IO;
using System.Runtime.InteropServices;
using System.Security.Permissions;
using WIA;


I created a simple enumeration for some of the more common errors that I expected.

public enum WiaScannerError : uint
{
LibraryNotInstalled = 0x80040154,
OutputFileExists = 0x80070050,
ScannerNotAvailable = 0x80210015,
OperationCancelled = 0x80210064
}

Instead of throwing a COMException I created a special exception class that provides an error code from the aforementioned enumeration.

[Serializable]
public class WiaOperationException : 
Exception
{
private WiaScannerError _errorCode;

     public WiaOperationException(WiaScannerError errorCode)
base()
{
ErrorCode = errorCode;
}

     public WiaOperationException(string message, WiaScannerError errorCode)
base(message)
{
ErrorCode = errorCode;
}

public WiaOperationException(string message, Exception innerException)
base(message, innerException)
{
COMException comException = innerException as COMException;

if (comException != null)
ErrorCode = (WiaScannerError)comException.ErrorCode;
}

     public WiaOperationException(string message, Exception innerException, WiaScannerError errorCode)
base(message, innerException)
{
ErrorCode = errorCode;
}

public WiaOperationException(System.Runtime.Serialization.SerializationInfo info,
System.Runtime.Serialization.StreamingContext context)
base(info, context)
{
info.AddValue(“ErrorCode”, (uint)_errorCode);
}

public WiaScannerError ErrorCode
{
get return _errorCode; }
protected set { _errorCode = value; }
}

public override void GetObjectData(System.Runtime.Serialization.SerializationInfo info,
System.Runtime.Serialization.StreamingContext context)
{
base.GetObjectData(info, context);
ErrorCode = (WiaScannerError)info.GetUInt32(“ErrorCode”);
}
}

The actual class I created is just for scanners, but you can adapt it to any device that supports WIA.  I’ve pulled out comments and removed some extra stuff like providing a friendly message for errors for the sake of brevity.

public sealed class WiaScannerAdapter : IDisposable
{
private CommonDialogClass _wiaManager;
private bool _disposed; 
// indicates if Dispose has been called

    public WiaScannerAdapter()
{
}

~WiaScannerAdapter()
{
Dispose(false);
}

     private CommonDialogClass WiaManager
{
get return _wiaManager; }
set { _wiaManager = value; }
}

[SecurityPermission(SecurityAction.Demand, UnmanagedCode = true)]
     public Image ScanImage(ImageFormat outputFormat, string fileName)
{
if (outputFormat == null)
throw new ArgumentNullException(“outputFormat”);

FileIOPermission filePerm =
new FileIOPermission(FileIOPermissionAccess.AllAccess, fileName));
filePerm.Demand();

ImageFile imageObject = null;

try
{
if (WiaManager == null)
WiaManager = new CommonDialogClass();

imageObject =
WiaManager.ShowAcquireImage(WiaDeviceType.ScannerDeviceType,
WiaImageIntent.ColorIntent, WiaImageBias.MinimizeSize,
outputFormat.Guid.ToString(“B”), falsetruetrue);

imageObject.SaveFile(fileName);
return Image.FromFile(fileName);
}
catch (COMException ex)
{
string message = “Error scanning image“;
throw new WiaOperationException(message, ex);
}
finally
{
if (imageObject != null)
Marshal.ReleaseComObject(imageObject);
}
}

public void Dispose()
{
Dispose(true);
GC.SuppressFinalize(this);
}

     private void Dispose(bool disposing)
{
if (!_disposed)
{
if (disposing)
{
// no managed resources to cleanup
}

// cleanup unmanaged resources
if (_wiaManager != null)
Marshal.ReleaseComObject(_wiaManager);

_disposed = true;
}
}
}

Calling the adapter is really easy.  Here’s an example that puts the image into a picturebox:

using (WiaScannerAdapter adapter = new WiaScannerAdapter())
{
try
{
Image image = adapter.ScanImage(ImageFormat.Bmp, @”c:\temp\test.bmp”);
pictureBox1.Image = image;
}
catch (WiaOperationException ex)
{
MessageBox.Show(ex.Message + “ Error Code: “ + ex.ErrorCode);
}
}

      Ref:

http://geekswithblogs.net/tonyt/archive/2006/07/29/86608.aspx
VS 2010 compiler error: Interop type XXX cannot be embedded. Use the applicable interface instead.

In most cases (such as error for the usage of UPnPNATClass as noted in one of the comments) this error is the result of code which tries to instantiate a COM object e.g. here piece of code starting up Excel:

Excel.ApplicationClass xlapp = new Excel.ApplicationClass();

Here it is enough to say that Excel.ApplicationClass derives from Excel.Application interface and one can even instantiate Excel using Excel.Application interface. Rewriting this code as below produces exact same results:

Excel.Application xlapp = new Excel.Application();

Ref: http://blogs.msdn.com/b/mshneer/archive/2009/12/07/interop-type-xxx-cannot-be-embedded-use-the-applicable-interface-instead.aspx

OpenCV-2.1.0 using CMake and Visual C++ 2010

Test on Windows7 SP1 32-bit

Pre-Requisites

ขั้นตอนการคอมไพล์ OpenCV-2.1.0 ด้วย CMake และ Visual C++ 2010

  1. เตรียม Solution ของ OpenCV 2.1.0 ด้วย CMake
  2. Build OpenCV 2.1.0 Solution ด้วย Visual C++ 2010
  3. สร้างโปรเจ็กส์ HelloWorld บน Visual C++ 2010
    • Configure Project Directories

เตรียม Solution ของ OpenCV 2.1.0 ด้วย CMake

  1. Download OpenCV-2.1.0-win.zip
  2. Extract to ‘C:\Program Files\’
  3. Create new folder: ‘C:\Program Files\OpenCV-2.1.0\build
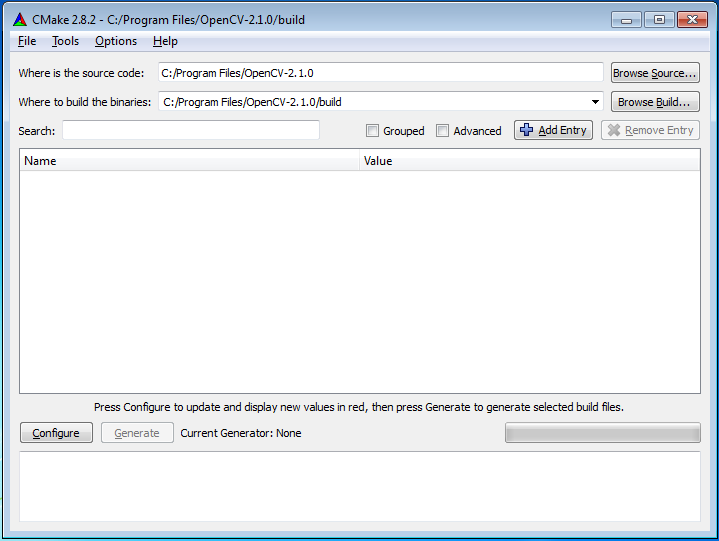
  4. Start -> Programs -> CMake 2.8 -> CMake (cmake-gui).
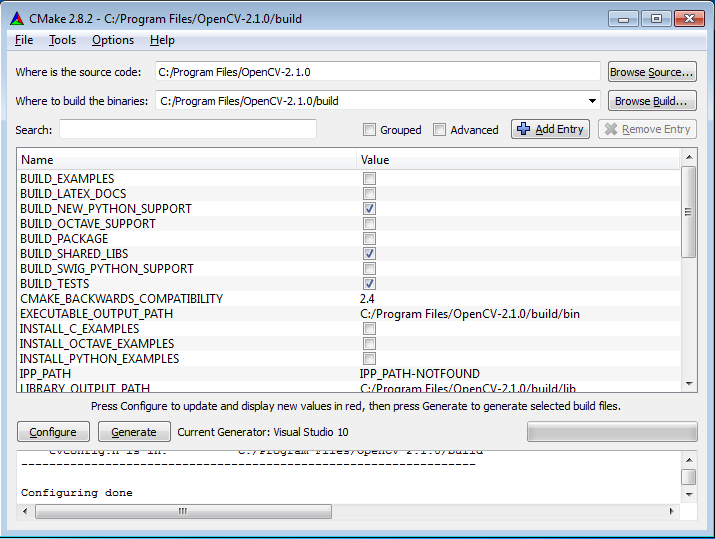
    • Where is the source code: ‘C:/Program Files/OpenCV-2.1.0/’
    • Where to build the binaries: ‘C:/Program Files/OpenCV-2.1.0/buildopencv_cmake01
  5. Click ‘Configure‘ button
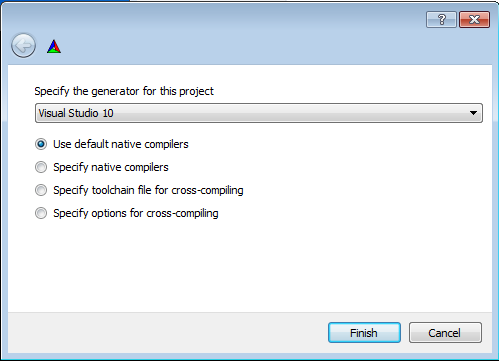
    • Specify the generator for this project: Visual Studio 10
    • select Use default native compilers
      opencv_cmake02
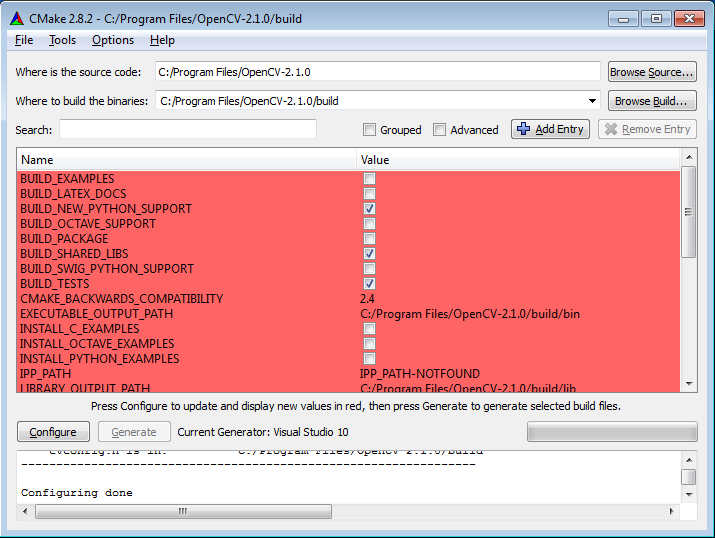
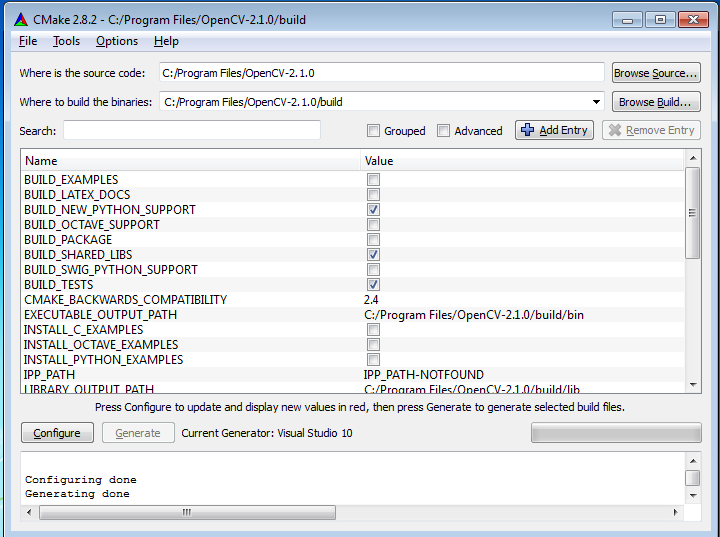
  6. Click ‘Configure‘ buttonopencv_cmake03opencv_cmake04
  7. Click ‘Generate‘ buttonopencv_cmake05

Build OpenCV 2.1.0 Solution

Start -> Programs -> Microsoft Visual Studio 2010  -> Microsoft Visual C++ 2010

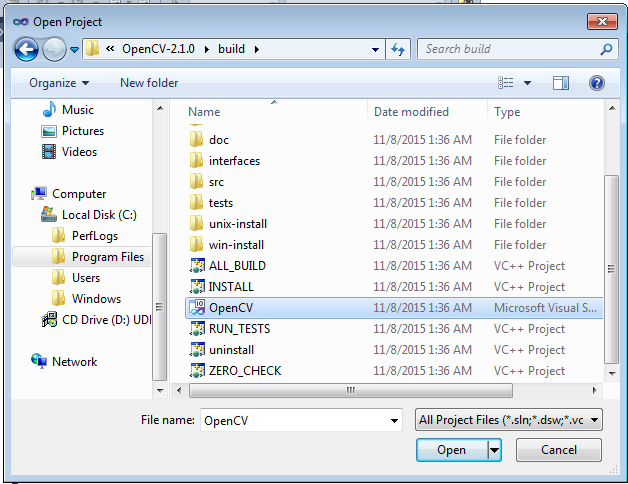
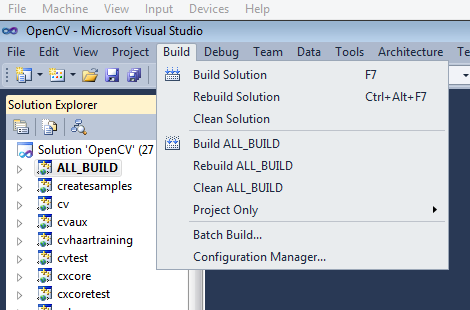
  • File -> Open -> Project/Solution…’C:\Program Files\OpenCV-2.1.0\build\OpenCV.slnopencv_cmake06
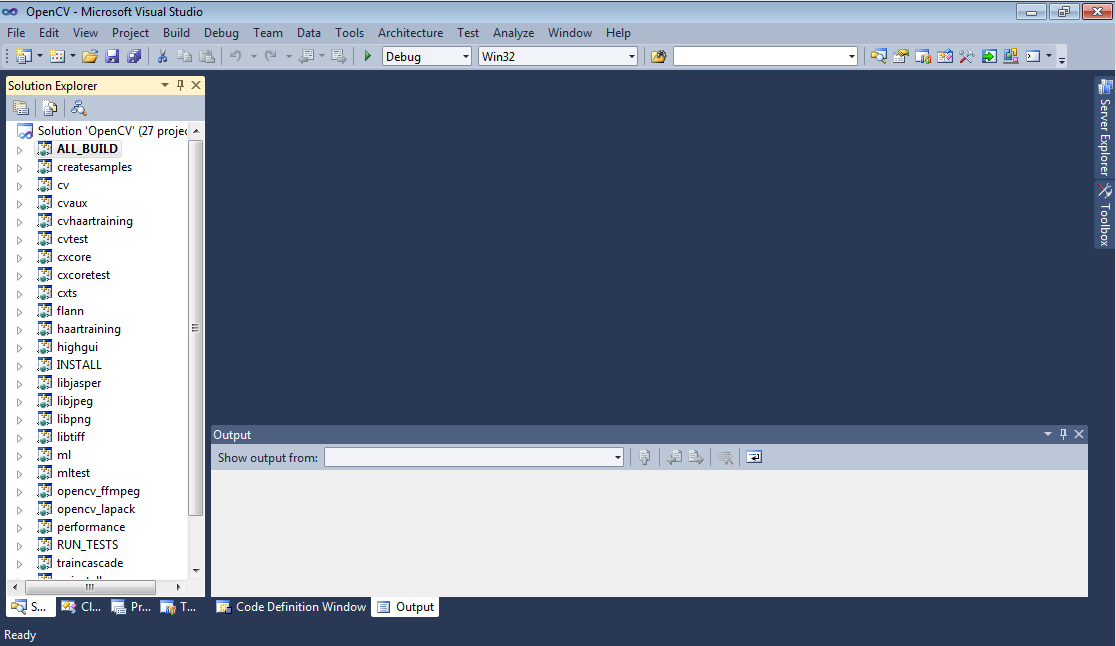
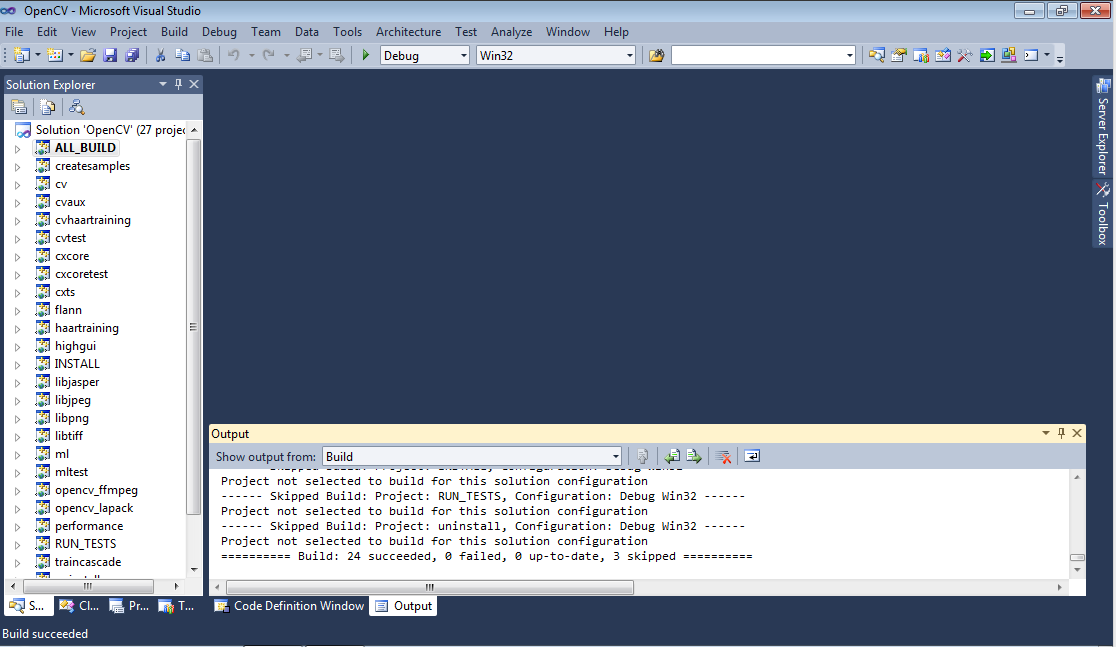
  • After MSVC has finished parsing all of the files (It will say ‘Ready‘ in the bottom left corner): Build -> Build Solutionopencv_cmake07opencv_cmake08
  • After some time, OpenCV should build successfully.opencv_cmake09

สร้างโปรเจ็กส์ HelloWorld

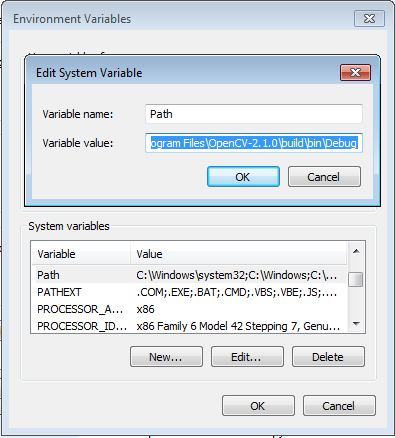
  • To permanantly include necessary .dll files, add ‘C:\Program Files\OpenCV-2.1.0\build\bin\Debug‘ to PATH by visiting Advanced tab in System of Windows. (add to system path manually)
    opencv_cmake10
  • Start -> Programs -> Microsoft Visual Studio 2010 -> Microsoft Visual C++ 2010
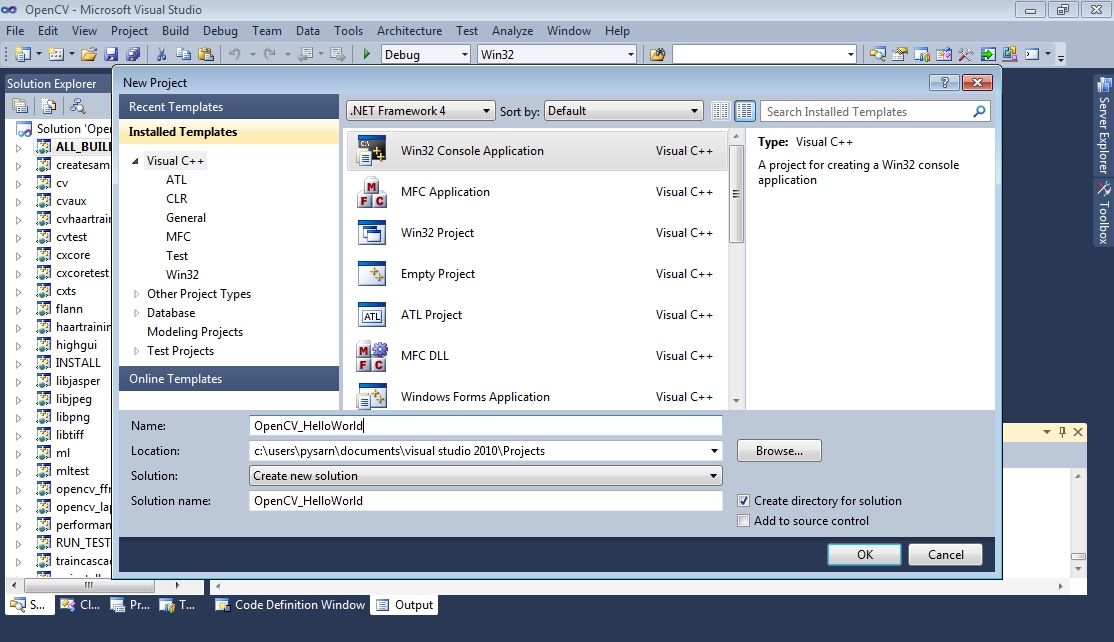
    • File -> New -> Project
    • Name: ‘OpenCV_Helloworld‘…’OK’…’Finish’
      opencv_cmake11

Configure Project Directories

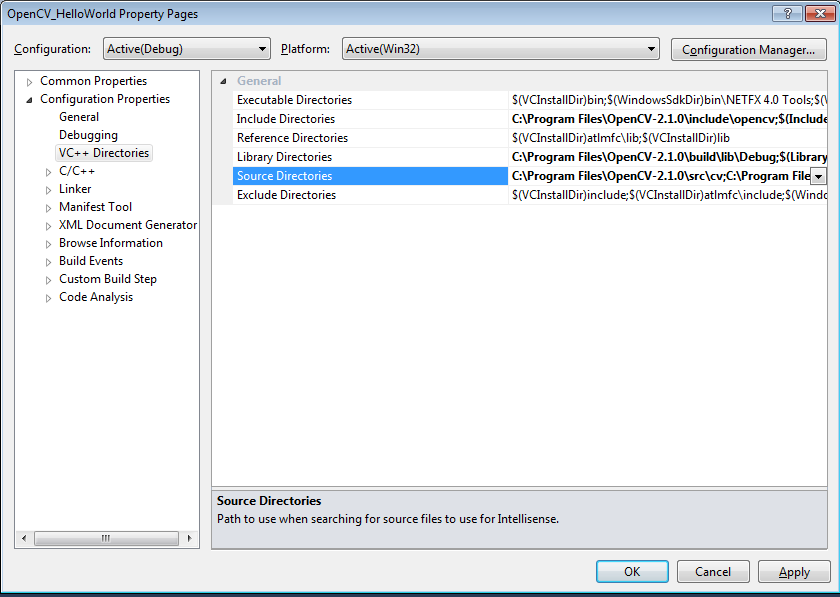
  • Project -> OpenCV_Helloworld Properties…Configuration Properties -> VC++ Directories
  • Include Directories…add: ‘C:\Program Files\OpenCV-2.1.0\include\opencv;’
  • Library Directories…add: ‘C:\Program Files\OpenCV-2.1.0\build\lib\Debug;’
  • Source Directories…add: ‘C:\Program Files\OpenCV-2.1.0\src\cv;C:\Program Files\OpenCV-2.1.0\src\cvaux;C:\Program Files\OpenCV-2.1.0\src\cxcore;C:\Program Files\OpenCV-2.1.0\src\highgui;C:\Program Files\OpenCV-2.1.0\src\ml;’
    opencv_cmake12
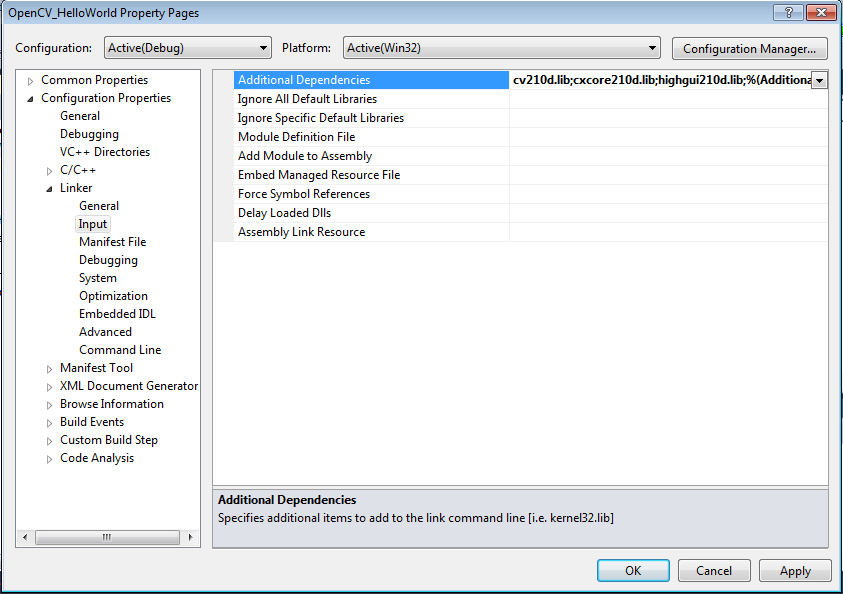
  • Linker -> Input -> Additional Dependencies…add: ‘cv210d.lib;cxcore210d.lib;highgui210d.lib;
    opencv_cmake13
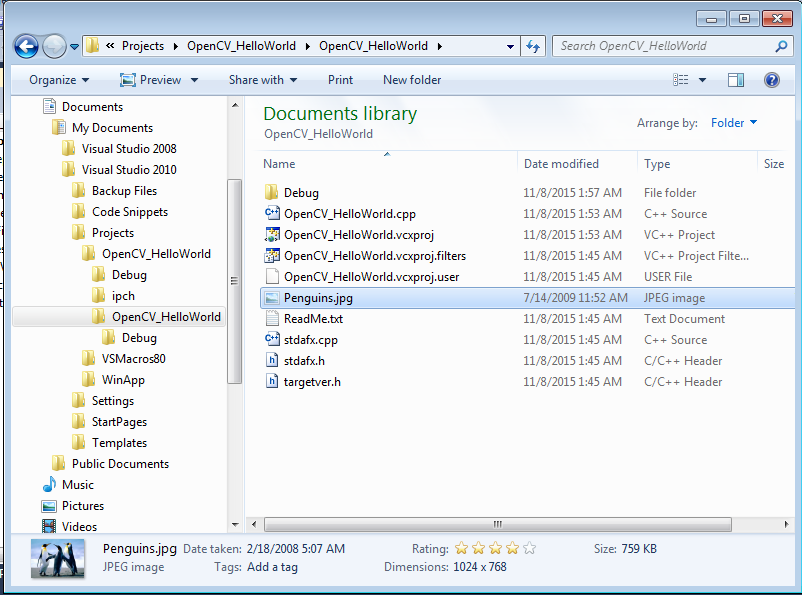
  • copy image test to project directory
    opencv_cmake14

ที่มา: OpenCV-2.1.0 using CMake and Visual C++ 2010 Express on Windows XP SP3 32-bit

ปล. ติดตั้งจาก OpenCV-2.1.0-win32-vs2008.exe (ไม่ได้ใช้ CMake) แล้วกำหนดค่า Proproties ของ Project ตามข้างบนแล้ว แต่เวลา run แล้วเกิด Error ดังนี้ “The application was unable to start correctly (0xc0150002)” ทางแก้คือ เปลี่ยนจาก ‘cv210d.lib;cxcore210d.lib;highgui210d.lib;‘  เป็น ‘cv210.lib;cxcore210.lib;highgui210.lib;‘ http://opencv-users.1802565.n2.nabble.com/Application-failed-to-start-correctly-0xc0150002-td4107823.html

CSharp using C++ DLL

ในบทความนี้เป็นการใช้ C# เรียกใช้ DLL ที่เขียนจากภาษา C++

1. สร้างโปรเจ็กส์ C# เพื่อใช้งาน Dll ชื่อ CSConsole เป็นแบบ Console Application

2. สร้างโปรเจ็กส์ C# เพื่อใช้งาน Dll ชื่อ CSWinForm เป็นแบบ Windows Forms Application

เพิ่ม Code

using System;

เพิ่ม Code

using System;

ที่มา: Platform Invoke Tutorial