Decoding .flac files with Winamp

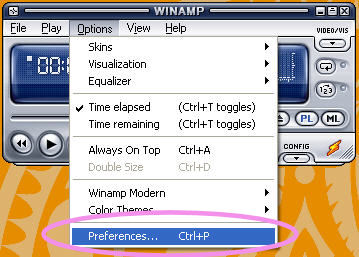
1.  Open Winamp and select Options and then Preferences… (note: if you’re using the “classic version” skin, open the Winamp Preferences by clicking the Control and p keys on your keyboard)

001_1

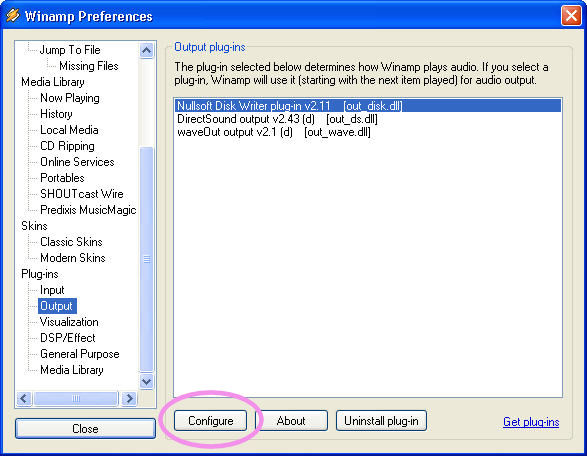
2. Select Output from the Plug-ins section of the left window, and then select Nullsoft Disk Writer. Click Configure.
002_1
3.Click the Directory: button so you can choose a location to save the .wav files
003_1

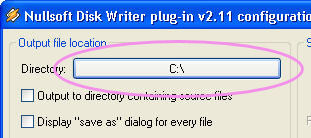
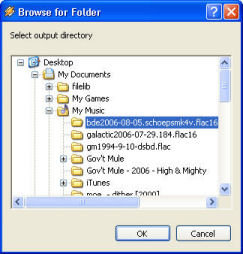
4. Navigate to the folder you want to save the .wav files in. I usually save them in the same folder as the .flac files.
004_0

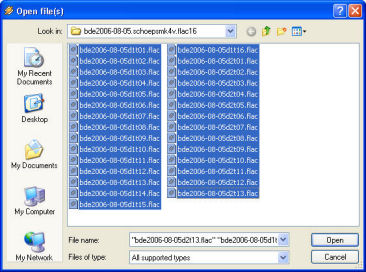
5. Click OK to return to the Preferences window, and then Close to return to Winamp. Now select File -> Play file… and navigate to the folder with your .flac files. Select all of the .flac files by single-clicking the first file, holding down the Shift key on your keyboard, and then single-clicking the last file. When all of the files are selected, click Open
005_0

6. Press the Play button. Winamp will now decode the .flac files and turn them into .wav files. It typically takes about 20 seconds to convert a 5 minute song, but this depends on how “fast” your PC is.

Once Winamp is done decoding the files, make sure to set the Plug-ins -> Output back to DirectSound output, or the next time you try to play a file using Winamp, it will decode that file instead.

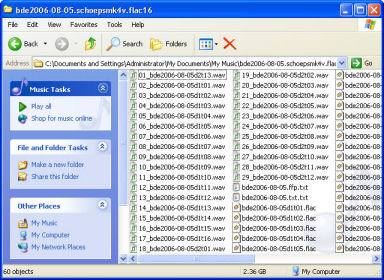
Check to make sure all of the .wav files were created.

006_0

ที่มา: Simple Help

สามัคคีชุมนุม

เนื้อเพลง สามัคคีชุมนุม

..พวกเราเหล่ามาชุมนุม
ต่างกุมใจรัก สมัครสมาน
ล้วนมิตรจิตชื่นบาน
สราญเริงอยู่ทุกผู้ทุกนาม
(สร้อยเพลง)อันความกลมเกลียว
กันเป็นใจเดียว ประเสริฐศรี
ทุกสิ่งประสงค์จงใจ
จักเสร็จสมได้ด้วยสามัคคี

..กิจใด ธ ประสงค์มี
ร่วมใจภักดีต่อพระจอมสยาม
พร้อมพรึบดังมือเดียว
ยามยากเห็นช่วยบ่หน่าย บ่จาง

(สร้อยเพลง)

..ที่หนักก็จักเบาคลาย
ที่อันตรายก็ขจัดขัดขวาง
ฉลอง ระเดชบ่จาง
กะตะเวทิคุณพระกรุณา

(สร้อยเพลง)

..สามัคคีนี่แหละล้ำเลิศ
จักชูชาติเชิด พระศาสนา
สยามรัฐจักวัฒนา
ปรากฏเกียรติฟุ้งเฟื่อง
กระเดื่องแดนดิน

ที่มา: oknation.netdek-d.com

Embedded

Link Embedded

Raspberry Pi Thailand

http://www.thaieasyelec.com/
http://www.thaieasyelec.com/index.php?lay=show&ac=cat_show_pro_detail&pid=54954
http://www.electoday.com/bbs/forumdisplay.php?fid=26
http://www.friendlyarm.net/downloads
http://beagleboard.org/
http://www.es.co.th/detail.asp?Prod=MICRO2440%2BLCD3.5
http://www.etteam.com

Hosting Project on code.google.com

ก่อนอื่นต้องมีปัญชีผู้ใช้ gmail ก่อน

จากนั้นดู ขั้นตอนเบื้องต้นได้ที่ http://code.google.com/p/support/wiki/GettingStarted

ลงมือสร้าง Project ใหม่ได้ที่ http://code.google.com/hosting/createProject

หลังจากสร้าง Project เสร็จแล้ว ก็ Upload ไฟล์ขึ้นไปได้ที่ Tab Download > New download

newdownload

แต่ถ้าจะใช้ Command Line Interface (CLI) บน Ubunu ก็ให้ติดตั้ง Package ดังนี้
sudo apt-get install subversion

จากนั้นให้ไปที่ Tab Source ดังรูป

source

ก็ให้เปลี่ยน Directory ปัจจุบัน ไปยังตำแหน่งที่ต้องการจะใช้งานร่วมกับ SVN จากนั้นก็พิมพ์คำสั่งตามนั้นได้เลย

svn checkout https://cykparser.googlecode.com/svn/trunk/ –username mr.phaisarn

cykparser คือในรูปคือชื่อ Directory ดังนั้นถ้าไม่พิพม์ cykparser ก็จะได้ Directory trunk มาแทน

เมื่อ checkout มาแล้ว ทำการแก้ไขเสร็จ ถ้าต้องการ update กลับไปให้ใช้คำสั่ง

svn commit <path_to_filename>

รอสักแป๊บ จะเห็น nano editor ขึ้นมาให้พิมพ์ข้อความกำกับว่า  revision นี้ได้แก้ไขอะไรไปบ้าง ทำการ Save และออกมาจากนั้นรอแป๊บนึง เป็นอันเสร็จ

คำสั่งอื่นๆของ svn client

svn add /path/to/file – เปลี่ยนสถานะไฟล์เป็น added รอการเพิ่มไฟล์เข้าสู่ reo
svn delete /path/to/file – เปลี่ยนสถานะไฟล์เป็น deleted รอการลบไฟล์จาก repo
svn update [/path/to/file] – update version ของไฟล์บน client ให้เป็นเหมือน server เปรียบเหมือน ftp download หากสั่ง update เฉยๆ โดยไม่ใส่ตำแหน่งไฟล์ จะเป็นการ update ไฟล์ใหม่ทั้งหมด
svn commit [/path/to/file] – update version ของไฟล์บน server ให้เหมือนบน client เปรียบเหมือน ftp upload หากสั่ง commit เฉยๆ โดยไม่ใส่ตำแหน่งไฟล์ จะเป็นการ update ไฟล์ทั้งหมด
svn status – ใช้ดูสถานะไฟล์ใน working copy

ที่มา: code.google.comubuntuclub.comการใช้งาน subversion เบื้องต้น

Imagelab

Imagelab
http://imagelab.ing.unimore.it/imagelab/labeling.asp
(Image Database) MIR FLICKR Download (25,000)
(Image Database) The USC-SIPI Image Database
(Image Database) http://www.cs.cmu.edu/~cil/v-images.html
(Image Database) http://code.google.com/p/tesseract-ocr/ boxtiff-2.01.eng.tar
(Image Database) CMU/VASC Image Database

connected component labeling is

Free eBooks by Project Gutenberg
(Image Database – Request Access) The grayscale FERET Database
(Image Database – Request Access) Face Database

การจับเวลาด้วย Python

ตัวอย่างการใช้ฟังก์ชั่น clock() and time() บน Windows and Linux
Run on linux
>>> from time import clock, time
>>> print clock(), time()
0.01 1169573460.96
>>> print clock(), time()
0.01 1169573463.76
>>> print clock(), time()
0.01 1169573467.09
>>>
Run on Windows
>>> from time import clock, time
>>> print clock(), time()
7.54285810068e-006 1169574534.84
>>> print clock(), time()
3.32073322168 1169574538.16
>>> print clock(), time()
7.32428004118 1169574542.15
>>> #!/usr/bin/python

จะเห็นได้ว่าฟังก์ชั่น time() เหมาะกับการนำมาใช้จับเวลามากกว่า (แต่ก็ไม่ตรงซะทีเดียว สู้คำสั่ง command line:time  ไม่ได้)
import time

[code lang=”python”]
def procedure():
time.sleep(2.5)

# measure process time
t0 = time.clock()
procedure()
print time.clock() – t0, "seconds process time"

# measure wall time
t0 = time.time()
procedure()
print time.time() – t0, "seconds wall time"

0.0 seconds process time
2.50023603439 seconds wall time
[/code]

ที่มา: stackoverflow.comdocs.python.orgtutorialspoint.com

QueryPerformanceCounter()

ฟังก์ชั่น QueryPerformanceCounter() ใช้จับเวลาการทำงาน เป็นฟังก์ชั่นที่มีใน Windows ส่วนใน Linux ต้องเขียนฟังก์ชั่นนี้เอง โดย Code แสดงดังข้างล่างนี้
This function basically recreates the win32 QueryPerformanceCounter() on Linux, play with this code:

[code lang=”c”]
#include <sys/time.h>
#include <stdint.h>
#include <stdbool.h>
#include <stddef.h>
#include <assert.h>

/* Helpful conversion constants. */
static const unsigned usec_per_sec = 1000000;
static const unsigned usec_per_msec = 1000;

/* These functions are written to match the win32
signatures and behavior as closely as possible.
*/
bool QueryPerformanceFrequency(int64_t *frequency)
{
/* Sanity check. */
assert(frequency != NULL);

/* gettimeofday reports to microsecond accuracy. */
*frequency = usec_per_sec;

return true;
}

bool QueryPerformanceCounter(int64_t *performance_count)
{
struct timeval time;

/* Sanity check. */
assert(performance_count != NULL);

/* Grab the current time. */
gettimeofday(&time, NULL);
*performance_count = time.tv_usec + /* Microseconds. */
time.tv_sec * usec_per_sec; /* Seconds. */

return true;
}
[/code]
ที่มา: TIGForums

Time command

$ time ls
real    0m0.005s
user    0m0.004s
sys    0m0.000s

* The elapsed (real) time between invocation of utility and its
termination.

* The User CPU time, equivalent to the sum of the tms_utime and
tms_cutime fields returned by the times() function defined in the
System Interfaces volume of IEEE Std 1003.1-2001 for the process in
which utility is executed.

* The System CPU time, equivalent to the sum of the tms_stime and
tms_cstime fields returned by the times() function for the process
in which utility is executed.

ที่มา: Time