PHP : การโชว์ thumbnail

ไฟล์ภาพขนาดเล็ก (Thumbnail) เก็บอยู่ที่ “./thumbnail/”
ส่วนภาพขนาดใหญ่เก็บอยู่ที่ “./uploads/”
ดังนั้นเวลาแสดงภาพให้นำภาพที่ “./thumbnail/” มาแสดง แต่เวลาสร้างลิงค์ไปที่ไฟล์รูปภาพขนาดใหญ่ให้ชี้ไปที่ “./uploads/”

[code lang=”php”]
<?
$imgPathUpload = "./uploads/";
$imgPathThumbnail = "./thumbnail/";
$dirHandle = opendir($imgPathThumbnail);
while ($file = readdir($dirHandle)) {
if(!is_dir($file) && strpos($file, ‘.jpg’)>0 || strpos($file, ‘.gif’)>0 || strpos($file, ‘.png’)>0) {
if (strpos($file,"thumb_")===FALSE)
echo ("<a href=$imgPathUpload$file><img src=$imgPathThumbnail$file></a>");
}
}
closedir($dirHandle);
?>
[/code]

PHP: Upload และปรับเปลี่ยนขนาดรูปภาพ

!! ถ้า upload ไม่ผ่าน ให้เซ็ต permission เป็น 777
แต่ถ้ายัง upload ไม่ผ่านอีก อาจเป็นเพราะไม่สามารถเซ็ต permission จาก ftp client ได้
ให้ไปเซ็ต permission ที่ panel ให้เป็น 777

$_FILES[‘var’][‘tmp_name’] แสดงเท็มสำหรับการอัพโหลด
$_FILES[‘var’][‘name’] แสดงชื่อไฟล์
$_FILES[‘var’][‘size’] แสดงขนาดของไฟล์มีหน่วยเป็นไบต์
$_FILES[‘var’][‘type’] แสดงประเภทของไฟล์
$_FILES[‘var’][‘error’] แสดงรายละเอียดข้อผิดพลาด

ไฟล์ .html

[code lang=”html”]</pre>
<form action="upload_resize.php" enctype="multipart/form-data" method="post">
<h2>Form upload and resize image.</h2>
<input type="hidden" name="MAX_FILE_SIZE" value="1000000" />
<input type="file" name="fileupload" />

<input type="submit" value="submit" />
<input type="reset" value="Reset" />
</form>
<pre>

[/code]

ไฟล์ .php

[code lang=”php”]
<?php
function imageResize( $ext, $ori_file, $new_file )
{
$max_imageSize = 400;
$ori_size = getimagesize($ori_file);
$ori_w = $ori_size[0];
$ori_h = $ori_size[1];

if($ori_w > $ori_h) {
$new_w = $max_imageSize;
$new_h = round(($new_w/$ori_w) * $ori_h);
}
else
{
$new_h = $max_imageSize;
$new_w = round(($new_h/$ori_h) * $ori_w);
}

if ($ext == "jpg" or $ext == "jpeg") {
$ori_img = imagecreatefromjpeg($ori_file);
} else
if ($ext == "png") {
$ori_img = imagecreatefrompng($ori_file);
} else
if ($ext == "gif") {
$ori_img = imagecreatefromgif($ori_file);
}

$new_img = imagecreatetruecolor($new_w, $new_h);
imagecopyresized($new_img, $ori_img, 0, 0, 0, 0, $new_w, $new_h, $ori_w, $ori_h);
if ($ext == "jpg" or $ext == "jpeg") {
imagejpeg($new_img, $new_file);
} else
if ($ext == "png") {
imagepng($new_img, $new_file);
} else
if ($ext == "gif") {
imagegif($new_img, $new_file);
}

imagedestroy($ori_img);
imagedestroy($new_img);
}

$imagePath = "./uploads/";
$new_file = $imagePath . "test_resize.jpg";
//echo $new_file;
echo "<br>";

$fileupload = $_FILES[‘fileupload’][‘tmp_name’];
$fileupload_name = $_FILES[‘fileupload’][‘name’];
$fileupload_size = $_FILES[‘fileupload’][‘size’];
$fileupload_type = $_FILES[‘fileupload’][‘type’];

echo $fileupload;
echo "<br>";
echo $fileupload_name;
echo "<br>";

$ext = strtolower(end(explode(‘.’, $fileupload_name)));

if ($ext == "jpg" or $ext == "jpeg" or $ext == "png" or $ext=="gif") {
copy($fileupload, $imagePath . $fileupload_name);

$ori_file = $imagePath . $fileupload_name;
imageResize( $ext, $ori_file, $new_file );
unlink($fileupload);

echo "<H1>Upload and resize complete</h1>";
} else {
echo "<h1>Error</h1>";
}
?>
[/code]

ที่มา: thaicreate.com/

PHP: เปลี่ยนขนาดรูปภาพ JPEG

[code lang=”php”]
<?php
function imageResize( $ori_file, $new_file )
{
$max_imageSize = 100;
$ori_size = getimagesize($ori_file);
$ori_w = $ori_size[0];
$ori_h = $ori_size[1];

if($ori_w > $ori_h) {
$new_w = $max_imageSize;
$new_h = round(($new_w/$ori_w) * $ori_h);
}
else
{
$new_h = $max_imageSize;
$new_w = round(($new_h/$ori_h) * $ori_w);
}

$ori_img = imagecreatefromjpeg($ori_file);
$new_img = imagecreatetruecolor($new_w, $new_h);
imagecopyresized($new_img, $ori_img, 0, 0, 0, 0, $new_w, $new_h, $ori_w, $ori_h);

imagejpeg($new_img, $new_file);
imagedestroy($ori_img);
imagedestroy($new_img);
}

$imagePath = "./images/";
$ori_file = $imagePath . "test.jpg";
$new_file = $imagePath . "test_resize.jpg";

echo "<H1>Start resizing image</h1>";
imageResize( $ori_file, $new_file );

echo "<H1>Resize complete</h1>";
echo "<img src=’$ori_file’>";
echo "<img src=’$new_file’>";
?>
[/code]

เตรียมตัวเขียน Android app บน Ubuntu 12.04

1. ติดตั้งแบบง่ายด้วย ADT Bundle

  1. เปิดหน้าดาวน์โหลด Android SDK
  2. ดาวน์โหลด ADT Bundle จะได้ไฟล์ adt-bundle-linux-x86_64-20130514.zip
  3. แตกไฟล์จะได้ไดเร็กทอรี่ adt-bundle-linux-x86_64-20130514
  4. สร้างไดเร็กทอรี่ชื่อ Development ไว้ใต้ /home/jack/ (สร้างชื่ออื่นก็ได้)
  5. คัดลอก adt-bundle-linux-x86_64-20130514 มาไว้ใต้ /home/jack/Development เป็นอันเสร็จสิ้นการติดตั้ง

2. ติดตั้ง SDK บน Eclipse เอง

$ sudo apt-get install eclipse

หลังจากที่ติดตั้ง eclipse เสร็จให้ติดตั้ง ADT Plugin ดังนี้

Continue reading

หลังจากติดตั้ง Ubuntu 12.04 แล้วลงเพจเกจอะไรต่อ

อัพเดทเพจเกจ ให้ล่าสุดก่อน

sudo apt-get update
sudo apt-get upgrade

ตรวจสอบหารายชื่อเพจเกจที่ต้องการที่

http://packages.ubuntu.com

รายชื่อเพจเกจพื้นฐานที่ developer ควรมี

RestrictedFormats

Ubuntu restricted extras

Addlibdvdccs

In addition, in order to play DVDs, you need to install libdvdcss by entering the following in a terminal:

เพจเกจสำหรับ Entertainment

TeamViewer

VLC คำสั่งสำหรับติดตั้ง VLC และ ติดตั้ง plugin สำหรับ browser ได้จากคำสั่ง

Ubuntu: How to mount an ISO file?

Using GUI

Navigate to the .iso file -> Right click -> Open with Archive Mounter.

Using Command line

1. Create a directory to serve as the mount location:

2. Mount the ISO into the target directory:

ที่มา: askubuntu.com/

ติดตั้ง Oracle java 6 jdk 64-bit บน Ubuntu 12.04

ดาวน์โหลด Java SE 6u45 (JDK) ที่

www.oracle.com/

ติดตั้ง

$ chmod u+x jdk-6u45-linux-x64.bin (ทำให้สามารถ execute ไฟล์นี้ได้)
$ ./jdk-6u45-linux-x64.bin (จะได้ไดเร็กทอรี่ jdk1.6.0_45)
$ sudo mv jdk1.6.0_45 /opt (ย้ายไปไว้ที่ /opt)

สร้าง symbolic  links ด้วยคำสั่ง update-alternatives

นิยาม update-alternatives – maintain  symbolic  links  determining  default commands
วิธีการใช้งาน update-alternatives –install <link> <name> <path> <priority>

$ sudo update-alternatives –install “/usr/bin/java” “java” “/opt/jdk1.6.0_45/bin/java” 1
$ sudo update-alternatives –install “/usr/bin/javac” “javac” “/opt/jdk1.6.0_45/bin/javac” 1
$ sudo update-alternatives –install “/usr/lib/mozilla/plugins/libjavaplugin.so” “mozilla-javaplugin.so” “/opt/jdk1.6.0_45/jre/lib/amd64/libnpjp2.so” 1
$ sudo update-alternatives –install “/usr/bin/javaws” “javaws” “/opt/jdk1.6.0_45/bin/javaws” 1

กำหนด Java ตัวที่ติดตั้งให้เป็น Default

ถ้าติดตั้ง Java ไว้หลายตัวในเครื่อง ให้ทำการกำหนดให้ Java ตัวที่พึ่งติดตั้งไปเป็น default (แต่ถ้าติดตั้ง Java แค่ตัวเดียวก็ไม่ต้องทำคำสั่งด้านล่างนี้)
$ sudo update-alternatives –config java
$ sudo update-alternatives –config javac
$ sudo update-alternatives –config mozilla-javaplugin.so
$ sudo update-alternatives –config javaws

ที่มา : help.ubuntu.com/

How to create a bootable USB stick on Ubuntu

To create a USB stick from which you can install Ubuntu, you must first download Ubuntu. Then, follow these instructions:

  1. Insert a USB stick with at least 2GB of free space.
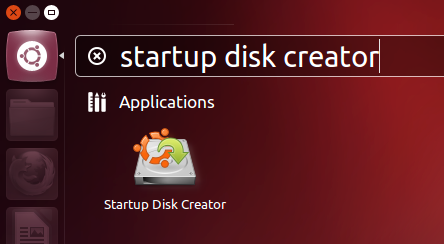
  2. Open the dash and search for Startup Disk Creator.
  3. Select the Startup Disk Creator to launch the app.

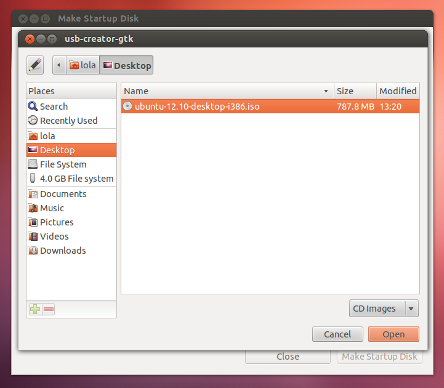
  4. Click ‘Other’ to choose the downloaded ISO file.

  5. Select the file and click ‘Open’.

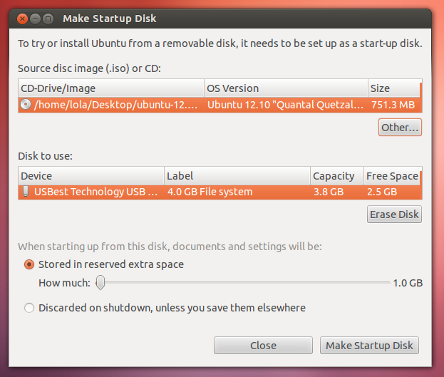
  6. Select the USB stick in the bottom box and click ‘Make Startup Disk’.

  7. That’s it! When the process completes, you’ll be ready to restart your computer and begin installing Ubuntu.

PHP : ติดต่อฐานข้อมูล MySQL ด้วย php

[code lang=”php”]
<?php
$con = mysql_connect("localhost","mysql_user","mysql_pwd");
if (!$con)
{
die(‘Could not connect: ‘ . mysql_error());
}

$sql = "SELECT * FROM Person";
mysql_query($sql,$con);

// some code

mysql_close($con);
?>
[/code]

[code lang=”php”]
<?php
$con = mysql_connect("localhost","mysql_user","mysql_pwd");
if (!$con)
{
die(‘Could not connect: ‘ . mysql_error());
}

$sql = "CREATE DATABASE my_db";
if (mysql_query($sql,$con))
{
echo "Database my_db created";
}
else
{
echo "Error creating database: " . mysql_error();
}
?>
[/code]

ที่มา : www.w3schools.com/

กรณีที่ต้องการใช้ภาษาไทยให้กำหนด Collation เป็น utf8_unicode_ci ดังนี้
[code lang=”php”]
<?php
$dbhost = ‘localhost’;
$dbname = ‘dbxxx’;
$dbuser = ‘userxxx’;
$dbpass = ‘passxxx’;

$conn = mysql_connect($dbhost, $dbuser, $dbpass)
or die (‘Error connecting to mysql’);
mysql_select_db($dbname);
mysql_query("SET NAMES UTF8");
$sql = "SELECT * FROM sometable";

if ($objQuery = mysql_query($sql, $conn))
{
echo "OK";
}
else
{
echo "Error " . mysql_error();
}
mysql_close($conn);
?>
[/code]