Working with files in Drupal 7

Drupal 7 has replaced the old Upload module (which provided the “Attachments” feature on nodes) with a FileField (as FileField is now in core). So, while there’s no longer the option to enable attachments for the content type within the main page of the content type edit form, you can now add a new File field to the content type. Once you’ve saved the new field for your content type, the upload form will appear on the edit page for nodes of that type.

Since in Drupal 7 both nodes and comments are “entities”, you can attach fields to both in the same way. When Comment module is enabled and you click to edit one of your content types, you’ll see both a Manage Fields tab (for fields on the node) and a Comment Fields tab (for fields on the comments for this particular content type).

ที่มา : https://drupal.org/node/1026432

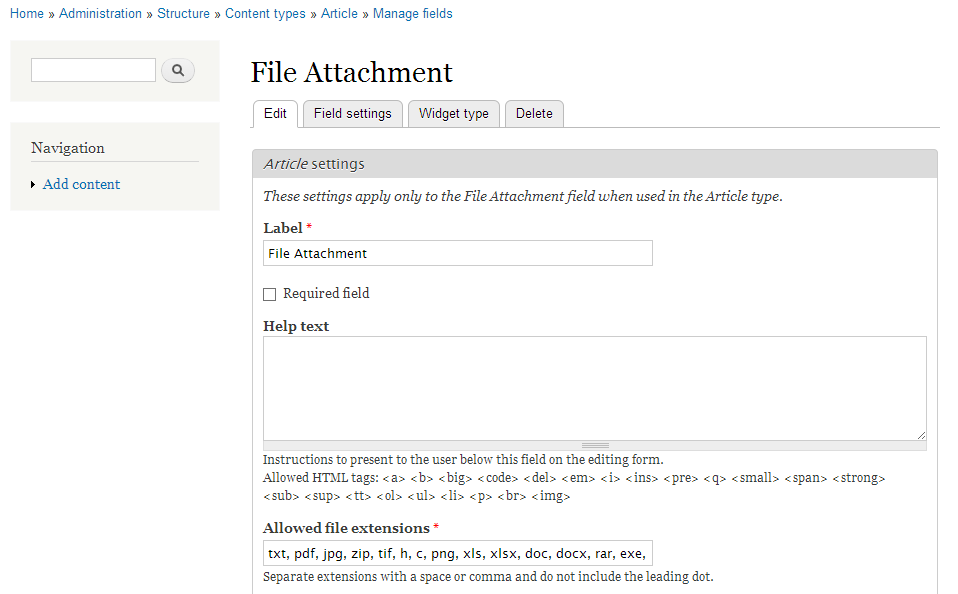
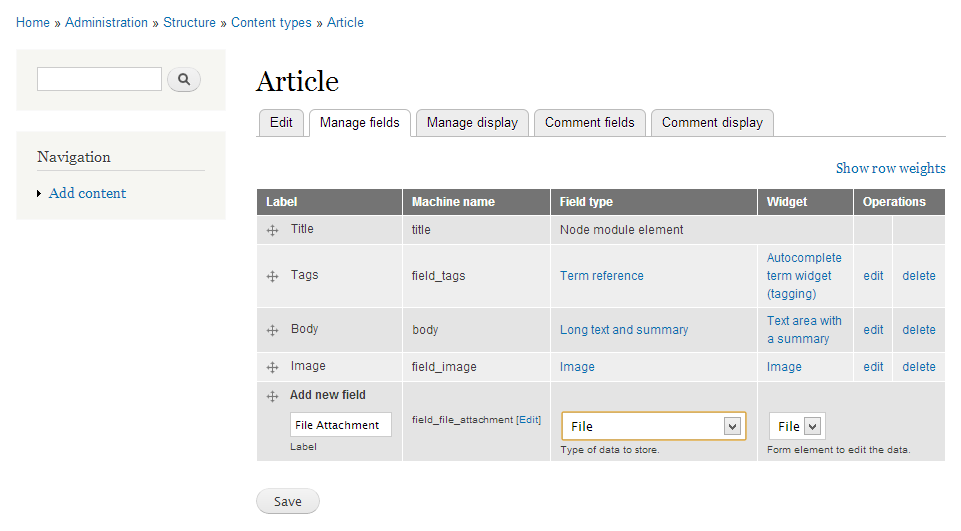
จากข้อความด้านบนสรุปได้ว่าโมดูล Upload ใน Drupal 6 ไม่มีแล้วใน Drupal 7 เพราะมีการสร้าง FileField ไว้ในแกนหลักของ Drupal 7 แล้ว การจะใช้งานก็ให้ไปทำการเพิ่มฟิลด์ให้กับ Content type ที่จะใช้ เช่นต้องการให้ Article สามารถทำการ Upload ไฟล์ได้ ก็ให้ไปเพิ่มฟิลด์ที่ Article ดังรูป

File_Attatchment

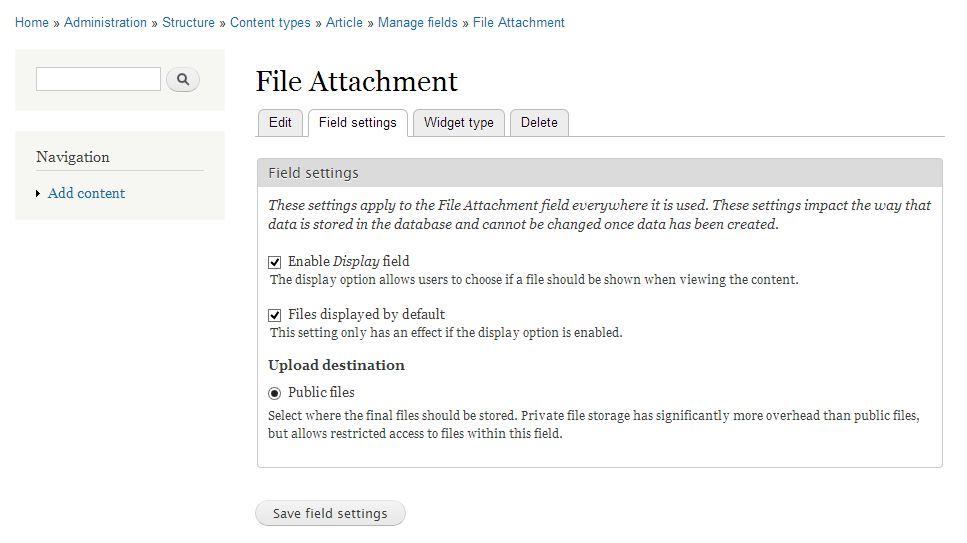
หลังจากกด Save จะแสดงหน้ากำหนดค่า

File_Attatchment2

การกำหนดค่าที่สำคัญคือ file extension ซึ่งปกติจะมีแต่ txt แต่ถ้าต้องการให้ Upload ไฟล์ชนิดอื่นได้ด้วย ให้เพิ่ม file extension คั่นด้วย comma ดังรูป

File_Attatchment3

ที่มา : https://drupal.org/documentation/modules/file

Upgrade จาก Drupal 6 ไปเป็น Drupal 7

ที่มา : https://drupal.org/node/570162

Upgrade Steps

    1. Backup your existing site and database.
    2. Update Drupal core, modules and themes to the latest releases for your existing Drupal version.
    3. Log in as user ID 1 (the site maintenance user).
      This is the user name that you created during the installation process for your site.
    4. Put your site in maintenance mode
      Go to the site maintenance page, select “Off-line” and save the configuration. If you have defined a custom maintenance theme in your settings.php file, comment it out before proceeding.
    5. Change all themes to Garland
      Go to the Themes page, enable “Garland” and select it as the default theme. If you have been using a separate theme for administration, select “Garland” for your administration theme as well. If you are using a custom maintenance theme, comment out 'maintenance_theme' => 'your theme name' in settings.php.
    6. Disable non-core modules
      Go to the Modules page and disable all modules that are not listed under “Core – required” or “Core – optional”. It is possible that some modules cannot be disabled, because others depend on them. Repeat this step until all non-core modules are disabled.If you know that you will not re-enable some modules for the target Drupal version and you no longer need their data, then you should uninstall them under the Uninstall tab after disabling them.You can also use Drush to disable all non-core modules (first save a list of all enabled modules):

      drush pml --no-core --type=module --status=enabled --pipe > modules.txt
      xargs -a modules.txt drush -y dis
      xargs -a modules.txt drush -y en
    7. Remove default settings file
      On the command line or in your FTP client, remove the file sites/default/default.settings.php
    8. Remove all old core files and directories
      Remove all old core files and directories, except for the ‘sites’ directory and any custom files you added elsewhere. If you made modifications to files like .htaccess or robots.txt, you will need to re-apply them from your backup, after the new files are in place.
    9. Remove uninstalled modules
      If you uninstalled any modules, remove them from the sites/all/modules and other sites/*/modules directories. Leave other modules in place, even though they are incompatible with Drupal 7.x.
    10. Download Drupal
      Download the latest Drupal release of the target version to a directory outside of your web root. Extract the archive and copy the files into your Drupal directory.On a typical Unix/Linux command line, use the following commands to download
      and extract:wget http://drupal.org/files/projects/drupal-x.y.tar.gztar -zxvf drupal-x.y.tar.gzThis creates a new directory drupal-x.y/ containing all Drupal files and directories. Copy the files into your Drupal installation directory:cp -R drupal-x.y/* drupal-x.y/.htaccess /path/to/your/installationIf you do not have command line access to your server, download the archive using your web browser, extract it, and then use an FTP client to upload the files to your web root.
    11. Re-apply modifications to core files
      Re-apply any modifications to files such as .htaccess or robots.txt.
    12. Make your settings.php file writeable
      Make your settings.php file writeable, so that the update process can convert it to the new format.
    13. Run the update script
      Run update.php by visiting http://www.example.com/update.php (replace www.example.comwith your domain name). This will update the core database tables.If you are unable to access update.php do the following:

      • Open settings.php with a text editor.
      • Find the line that says:$update_free_access = FALSE;
      • Change it into:$update_free_access = TRUE;
      • Once the upgrade is done, $update_free_access must be reverted to FALSE.
    14. Backup your database
      Backup your database after the core upgrade has run.
    15. Upgrade fields
      If you are upgrading from Drupal 6 to 7 and were using CCK (and perhaps additional modules) to create fields for your content types, you will need to upgrade the data in those fields as a separate step. Download the Drupal 7 CCK module, and turn on Content Migration. Go to Structure > Migrate Fields or http://example/com/admin/structure/content_migrate for a page to walk you through the migration process. There are now several types of fields in core, but not every type. You might need to download Drupal 7 versions of contributed modules to support other types of fields (such as the References module for nodereference fields and/or userreference fields). Learn more about migrating content from CCK to Core Fields.
    16. Update contrib modules and themes
      Replace and update your non-core modules and themes, following the procedures athttp://drupal.org/node/948216
    17. Check the Status Report
      Go to the Status Report page and verify that everything is working as expected.
    18. Make sure settings.php is secure
      Ensure that $update_free_access is FALSE in settings.php.
      Remove write permissions.
    19. Check Drupal Core Modules
      Make sure that standard modules from a typical fresh install are engaged. In a Drupal 6 to 7 upgrade, some modules that may not be engaged are: ‘Dashboard’, ‘Contextual Links’, ‘Overlay’, ‘Field’, ‘File’, ‘Image’ and ‘Shortcut’.
    20. Remove your site from Maintenance Mode
      Go to the Maintenance Mode page and disable the “Put site into maintenance mode” checkbox and save the configuration.

Note that the file structure, particularly the locations of core and contributed modules have changed in Drupal 8.

โดยสรุปคือ

  1. Backup ไฟล์ทั้งหมด และฐานข้อมูล
  2. Update โมดูลทั้งหมด ทั้ง core และ โมดูล กับ ธีม ให้ update ให้หมด
  3. ล็อกอินด้วย user ที่สร้างตอนติดตั้งเว็บไซต์
  4. เซ็ตให้เว็บไซต์ของเราเป็น maintenance mode
  5. เปลี่ยนธีมให้เป็น Garland
  6. ปิดการใช้งาน non-core modules
  7. ลบไฟล์ sites/default/default.settings.php
  8. ลบไดเร็กทอรี่ทั้งหมด ยกเว้น sites
  9. ลบโมดูลที่ปิดการใช้งานในข้อ 6
  10. ดาวน์โหลด Drupal 7
  11. x
  12. x
  13. ทำการ Update ด้วยการเรียก http://www.example.com/update.php 

หลังจากทำการ Update เสร็จแล้ว ถ้าต้องการให้ Admin ใช้งาน Overlay, Dashboard ให้ไป enable โมดูล Overlay, Dashboard

และยังมีอีกหลายๆ core modules ที่หลังจาก Update แล้วต้องไป enable เอง ไม่เหมือนการติดตั้งใหม่ core modules ต่างๆนี้จะ enable มาให้เลย

ปัญหาที่พบหลังการ Update

  1. Drupal 7 มี administrator role ซึ่ง Drupal 6 ไม่มี เลยไปเพิ่ม role เองที่ฐานข้อมูล จากนั้นมาที่หน้า admin -> people -> permissions เพื่อเพิ่มสิทธิให้กับ administrator role
  2. user ที่เป็น  administrator ไม่มี UI ให้กำหนดรูป (ยังไม่ได้หาทางแก้)
  3. content type ไม่เหมือนกัน ระหว่าง  Drupal 6 และ  Drupal 7 ทำให้ติดตั้ง CKEditor บนตัว update ไม่สามารถใช้งาน CKEditor ได้ (แต่ติดตั้ง CKEditor บน Drupal 7 ที่ install ใหม่ สามารถใช้งานได้ปกติ)
  4. enable โมดูล Dashboard แล้วทำงานได้ แต่เมนูนำทางต่างๆไม่ขึ้น (อาจต้องไปกำหนดค่าที่ไหนซักที่)

สรุปการ Update

การ Update จาก Drupal 6 ไปเป็น Drupal 7 สามารถทำได้ แต่ไม่สมบูรณ์นัก (เฉพาะโมดูล core ไม่นับโมดูลที่ติดตั้งเพิ่ม) ดังนั้นถ้าจำเป็นต้อง Update จาก Drupal 6 ไปเป็น Drupal 7 จริงๆ ก็ต้องเผื่อเวลาในการแก้ไขปัญหาจุกจิกต่างๆไว้พอสมควร