
Monthly Archives: June 2013
Resolve Attached Media Conflicts in VirtualBox
อาการ
เวลาที่ add เครื่องเข้า (machine) มาใน VirtualBox แล้วเกิด Error ดังนี้
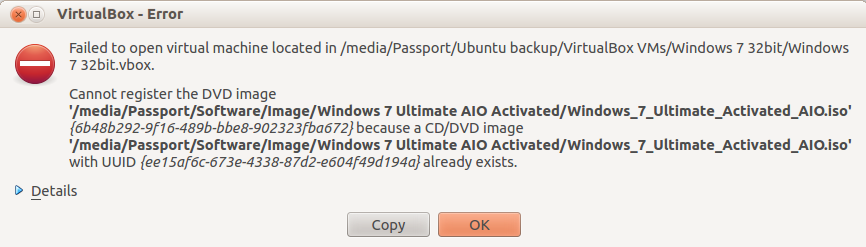
Failed to open virtual machine located in .....

Cannot register the DVD image '...' because a CD/DVD image '...' already exists.
สาเหตุ
เกิดจากการที่ machine ที่ add เข้ามาใหม่มี UUID ของ CD/DVD ชนกับ UUID ของ machine ที่มีอยู่เดิม ทำให้ add machine ใหม่เข้ามาไม่ได้
ทางแก้ไข
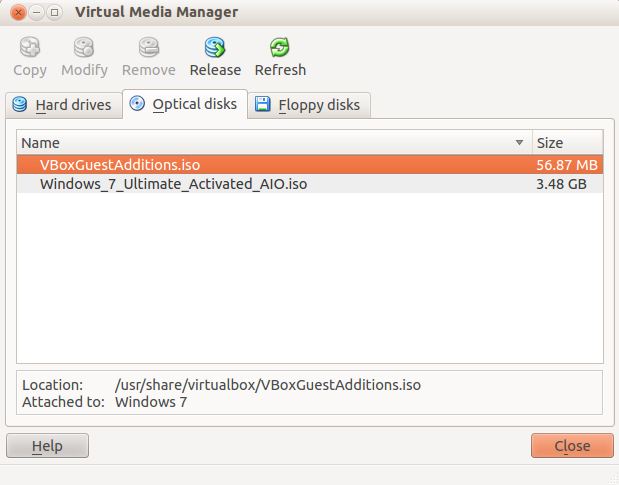
ไปที่ File -> Virtual Media Manager
แล้วไปที่ Tab Optical Disk จากนั้นลบ image ของ CD/DVD ออก <image>.iso เป็นอันเรียบร้อย (Windows_7_Ul…. ในรูป คือตัวที่ต้องเอาออก)
Drupal development tools
Last updated May 24, 2013. Created by mike stewart on May 29, 2007.
Edited by irohit786, radimklaska, cweagans, jacobbednarz. Log in to edit this page.
Use these development tools to help you create Drupal sites faster and with less effort. If you have a favorite Drupal tool that is not listed, make sure you’ve checked every section of this document.
Still can’t find your fav? Please add it using the format as other listings, similar to:
Toolname (Free/Commercial. FOSS/Proprietary. OS Platforms.) – Description.
Tools for Your Browser
- Microsoft Internet Explorer (Free. Proprietary. Windows only, but see below.)
- Internet Explorer Developer Toolbar
- Firebug Lite offers some Firebug functionality in a non-Firefox browser; also available as a Drupal module
- Drupal For Firebug
- Multiple Internet Explorer versions for testing purposes. This is not supported by Microsoft. It may be wise to backup your computer before installing
- Internet Explorer Application Compatibility VPC Image, provided by Microsoft, allows the testing of multiple versions of Internet Explorer on Windows through the use of VirtualPC images. Note that the images expire after a specified date. VirtualPC is a free download, but proprietary and for Windows only (For similar Virtualbox images, see below).
- IETester allows you to view sites in multiple IE versions without installing all of the versions
- If you want to run IE on a non-Windows computer:
- https://github.com/xdissent/ievms – Ready to use Virtualbox images for OS/X and Linux
- http://www.kronenberg.org/ies4osx/ – for OS/X
- http://www.tatanka.com.br/ies4linux/page/Main_Page – for Linux
- http://wddb.wine-doors.org/node/3 – for WINE on Linux
- http://modern.ie/en-us/virtualization-tools – Microsoft’s virtual machines packaged with Windows and IE
- Mozilla Firefox (Free. Open Source. Linux, Mac, Windows and others.)
- Web Developer Extension – Adds a tool bar and menu to the browser with various web developer tools. For example, you can disable form fields; reveal hidden form elements; edit CSS in real time; and clear the browser cache and session cookies.
- Firefox Drupal for Firebug Addon
- FireFTP – An FTP plugin for Firefox.
- Firebug – More tools for the web developer. Program CSS, HTML and JavaScript in real time; easily locate HTML elements and see what CSS is affecting them; examine a breakdown of the time components of your page download; discover errors in Javascript, CSS and XML; and explore the DOM.
- YSlow – A Firefox add-on integrated with the Firebug web development tool, YSlow analyzes a web page’s performance and returns a “performance report card” that shows how well the page utilizes a set of best practice guidelines for high performance web sites.
- Page Speed – Similar to YSlow, Page Speed Firefox/Firebug add-on allows you to evaluate the performance of your web pages and to get suggestions on how to improve them.
- There is also a Drupal for Firebug module, which includes a Firebug extension.
- How to setup a Firefox quick search for the Drupal API
- If you are a Windows Firefox user, the IE Tab Firefox extension adds the ability to display IE in a tab, or to view a particular Firefox tab in IE through the right-click menu
- Opera (Free. Proprietary. Linux, Mac, Windows and others. Versions 9.5 and above contain developer tools similar to Firebug for debugging web pages.)
- Firebug Lite offers some Firebug functionality in a non-Firefox browser; also available as a Drupal module
- Safari (Free. Proprietary. Mac and Windows. Contains a firebug-like debugger for JavaScript/html/css, a profiler and storage and audit tools, and the Webkit team is working on new and improved developer tools.) Shares code with Chrome.
- Firebug Lite offers some Firebug functionality in a non-Firefox browser; also available as a Drupal module
- Google Chrome (Free, multiplatform, Contains a firebug-like debugger for JavaScript/dom/css, a profiler and storage and audit tools.) Shares code with Safari.
- As above, Firebug Lite is available as a “bookmarklet” to provide a subset of Firebug’s functionality in Chrome.
Tools for Editing Text & Code
In the world of pure Linux/Unix, the most popular editors are the intimidating but powerful Emacs and Vi. Devotees have long argued the merits of which is better. You’ll want a cheat sheet to learn either, but serious users find that Emacs and Vi allow fast, touch-typed editing that’s quicker than using a mouse-based desktop application.
- Emacs (Free. Open source. Runs on Linux, Mac, Windows and others.) (Details aboutconfiguring Emacs for Drupal)
- VIM (Free. Open source. Linux, Mac, Windows and others.) — Vim is an advanced text editor based on vi, but more powerful. The learning curve is reasonably steep and the interface can be confusing at first, but this is soon rewarded with greater editing efficiency. (Details about configuring VIM for Drupal and documentation for the Vimrc project.)
Other Editors
- BBEdit (Commercial. Proprietary. Mac only.) Check out BBEdit Clippings for Drupal 7
- Bluefish Editor (Free. Open Source. POSIX > Linux. Mac. Windows. Fast, lean multi syntax WYSIWYN editor with a focus on HTML/CSS/Javascript – GTK+ based). The Windows version can be found at http://code.google.com/p/bluefish-win/
- Dreamweaver (Commercial. Proprietary. Mac and Windows.) – A WYSIWYG HTML/XHTML, CSS, PHP, XSL/T editor, and there’s a free Drupal API extension for Dreamweaver.
- gPHPEdit (Free. Open source. Runs on Linux)
- jEdit (Free. Open source. Runs on Linux, Mac, Windows and others. Java based.)
- Komodo Edit (Free. Open source. Runs on Linux, Mac and Windows. Configuration guideavailable.)
- Notepad++ (Free. Open Source. Windows only.) – A light-weight notepad replacement with tabbing and syntax highlighting.
- Smultron (Commercial. Proprietary. Mac only.)
- TextMate (Commercial. Proprietary. Mac only although a Windows clone exists) – A couple of Drupal specific bundles are available, the PHP Drupal bundle which has the most features and another by Steven Wittens which allows tab completion of function signatures – both can exist without conflict. A lot of the power of TextMate is in its bundle system and it has built-in support for diff which speeds up the rolling and applying of patches and many more.
- TextWrangler (Free. Proprietary. Mac only.) — Lets you read and save via FTP/SFTP, and supports grep and Show Changes (diff).
- Coda (Proprietary. Mac only.) – Editor for web pages (HTML, CSS) with preview and FTP capabilities; has a Drupal plugin.
- Sublime Text 2 – Win, Mac OSX, and Linux. A very clean and user friendly code editor. Interface is smooth. And compatible with many TextMate bundles. (Proprietary. Has full-featured trial available with no time limit.)
Integrated Development Environments (IDE)
IDE’s expand on the ability of a simple text editor. Here is a list of IDE’s that work well with PHP and Drupal.
Note: There is also a Drupal IDE group dedicated to setting up an IDE for Drupal development for starter tips, and ongoing interactive discussions.
- Eclipse (Free. Open source. Linux, Mac, Windows and others. Java based.) Probably the most popular open source IDE. Eclipse requires plugins in order to develop PHP. The PHP editing plugins for Eclipse are listed below by popularity:
- PHP Development Tools (PDT) from The Eclipse Foundation. This is generally considered the new version of PHPEclipse. Open source and community supported. PDT provides a PHP Development Tools framework for the Eclipse platform.
- PHP Development Tools (PDT) from Zend. Same as above but from Zend. Another commercially supported PHP development using Eclipse from version 3.3+.
- PHPEclipse project is the original PHP development plugin for Eclipse. This is considered the previous version. The new version is called PHP Development Tools (PDT). See above.
Notes about Eclipse:
- How to install Eclipse and configure it for Drupal.
- Read details of how to install and configure Eclipse for Drupal.
- Instructions for setting up Eclipse Ganymede on 64-bit Ubuntu
- To get a nice “all in one” package for working with PHP in Eclipse try the Easy Eclipse PHP distibution which includes PHPEclipse as well as SVN and other common plugins. Note that if you are using Easy Eclipse on Windows Vista, you are advised to change the install location to “C:\EasyEclipse for PHP 1.2.2.2”, as the software will probably not work with the default install location.
- Aptana (Free. Open source, though some features, notably SFTP support, require a commercial license. Linux, Mac, Windows and others. Java based.) — A full-featured Web Development IDE. A package based on the Eclipse environment that comes with the essentials right out of the box (PHP highlighting, ftp/sftp, code browser, etc).
- Netbeans cross-platform IDE with full PHP and debugging support. (Free. Open Source. Linux. Mac. Win. Solaris). Supported by Sun Microsystems (Oracle).
- Firefox extension easy Xdebug makes debugging easy with Netbeans.
- Very nice code completion
- Automatic text highlighting for tons of languages
- In context HTML, CSS, PHP reference makes it easy to find help on code syntax without leaving the file you are working on.
- Instructions for configuring Netbeans for Drupal
- Two Netbeans plugins are available to aid Drupal developers: NBDrupalSupport andNBDrupalDevel
- Bluefish Editor (Free. Open Source. Linux. Mac. Fast Lean multi syntax WYSIWYN editor – GTK+ based). A lightweight, fast, multi-syntax IDE that supports projects, multiple documents, ftp/webDAV/sftp/http/https/samba, user custom integration with many programs like make, lint, weblint, xmllint, tidy, javac, more…, multi-language translations, etc. Just an awesome text editor on steroids.
- Emacs (Free. Open source. Runs on Linux, Mac, Windows and others.) Mentioned above as “text editor” but also may be used as fully functional IDE for Drupal and PHP. Some of Emacs IDE functions appliable for PHP and Drupal are: syntax highlighting for PHP/JS/CSS/HTML, integration with VCSs (include git), debugger, on-type syntax checking for PHP/JS/CSS, Texmate-like code templates. (See details about configuring Emacs for PHP and Drupal and a project “Emacs IDE for Drupal”)
- Quanta Plus (Free. Open Source. Linux – Part of the KDE environment).
- Geany (Free. Open Source. POSIX > GTk+. Linux. Mac. Windows. Fast lean multi syntax – GTK+ based).
- Komodo IDE (Commercial. Proprietary. Linux, Mac and Windows.) Drupal Configuration notes available and Module building extension with node and user code intelligence
- Zend Studio (Commercial. Proprietary. Linux, Mac and others. Java based.)
- PhpEd (Commercial. Proprietary. Windows, Linux.)
- CodeLobster (Commercial and free versions. Proprietary. Windows only.) IDE with PHP/HTML/CSS/JavaScript highlighting, advanced PHP/HTML/CSS/JavaScript autocomplete, PHP debugger, SQL autocomplete, context and dynamic help.
- Xcode (Commercial, free with Mac OS X. Mac only.) Here are instructions on setting up Xcode to work with Drupal.
- PhpStorm (Commercial. Proprietary. Windows, Mac OS X, Linux. Java Based.) Code hinting, X-Debug.
- Tutorial-Video: How to use PhpStorm with Drupal
- Configuration tutorial: Integrating PhpStorm with the Drupal.org issue queue
SQL & Database tools
There is software that can aid your SQL and database needs with features ranging from queries to administration.
- DbVisualizer – Free & Commercial universal db tool for linux, windows and OSX. Works with any database that has jdbc drivers available.
- phpMyAdmin – Industry-standard PHP tool for querying, modifying and administering a MySQL database, included in most shared hosting packages (if not, find a different host! Or just install it yourself, not hard). For local database installations you could tryphpminiadmin which is an order of magnitude faster than phpMyAdmin, but has fewer features.
- Adminer – Adminer (formerly phpMinAdmin) is Free & Open Source, full-featured database management tool written in PHP. Conversely to phpMyAdmin, it consist of a single file ready to deploy to the target server. Adminer is available for MySQL, PostgreSQL, SQLite, MS SQL and Oracle. See also Adminer vs. phpMyAdmin comparison.
- pgadmin3 (Free. Windows/Linux/Mac PostgreSQL). Industry-standard for administering a PostgreSQL database, the SQL99 reference database. Runs from your desktop, SSL aware, no need to install anything on your server. The application also includes a syntax highlighting SQL editor, a server-side script editor, an SQL/batch/shell job scheduling agent, support for the Slony-I replication engine and much more.
- MySQL Workbench (Free. Windows/Mac/Linux. Source available. MySQL only.) – A GUI from MySQL allowing developers to design, model, query and administer MySQL databases. Replaces the MySQL GUI Tools Bundle.
- Toad for MySQL (Free. Windows. MySQL only.) – Toad for MySQL Freeware is a tool that improves the productivity of developers and administrators by providing an easy-to-use development environment.
Features:- Version Control Integration,
- Macro Record and Playback,
- Database Browser,
- Code Snippet Editor,
- Security Manager,
- SQL Editor, Fast,
- Multi-Tabbed Schema Browser,
- DB Extract,
- Compare-and-Search Utility,
- Import/Export Utility.
- FlySpeed SQL Query (Free. Windows. MySQL/PostgreSQL) — Builds queries without needing deep knowledge of SQL syntax and performs data manipulations such as export and reporting.
- Navicat (Free & Commercial. Windows, Linux, Mac. Versions for MySQL, Oracle, PostgreSQL.)
- Sequel Pro (Free. Mac. MySQL)
- SQLyog (Free Community Edition, Enterprise Edition. Windows. MySQL)
- HeidiSQL (Free & Open Source. Windows. MySQL only.)
Other Tools
- PuTTY (Free. Windows only.) – An SSH and telnet client.
- WinSCP – WinSCP is an open source free SFTP client and FTP client for Windows.
- 7 Zip (Free. Open Source. Windows is the primary platform, with ports listed on thedownload page.) – Extracts archived and compacted files (such as tarballs).
- Cygwin (Free. Open Source. Windows only.) – Allows Windows users to use a Unix like shell. This is particularly useful for interfacing with git and patching files; read more.
- Filezilla (Free. Open Source. Windows, Mac, and Linux.) – Graphical FTP client
- IE Net Renderer – Check your site on IE 6 & 7 without Windows
- UnxUtils (Free. Open Source. Windows only.) – a lightweight option for adding some Unix command line utilities such as patch and grep to Windows, for those not wishing to download Cygwin.
- Realtime CSS Viewer Gem (Free, runs on Ruby) – This is a CSS viewer that monitors your changes as you edit in any text editor.This link does not work anymore
Ref: drupal.org/
Add Users Howto
Information
This is out of date, the “User Accounts” app has changed in Ubuntu 11.10 and no longer has many functions.
When Ubuntu and/or Kubuntu are initially installed, a single user account was created. It is possible to create additional user logins on your system.
Options
There is more than one way to add a user, however this wiki page will briefly discuss the easiest and most common ways. The two ways shown are:
- Graphical
- Command-line – adduser
Command-line
To add a user you must use the sudo command (for an explanation of what that means, see the RootSudo page). Here are the commands:
To add a user. NOTE: do not use the useradd command.
|
1 |
$ sudo adduser <username> |
To see the options for adding a user try the man command.
|
1 |
$ man adduser |
Here is a useful example of the useradd command. Why use useradd? It gives a few more options for special cases. To add a user, give her a standard home directory in the /home folder and specify the shell she accesses by default do this:
|
1 2 |
$ sudo useradd username -m -s /bin/bash $ sudo passwd username |
Groups
You might also wish to create a new group for your users.
|
1 |
# sudo addgroup <groupname> |
To add a new user to a existing group you would do this:
|
1 |
# sudo adduser <username> audio |
To add an existing user to an existing group you can use the same command:
|
1 |
# sudo adduser <username> <groupname> |
or
|
1 |
# sudo usermod -aG <groupname> <username> |
Ref: help.ubuntu.com
การติดตั้ง Font ใน Ubuntu 12.04
copy ฟอน์ทจาก c:\Windows\Fonts ใน Windows 7
สร้างไดเร็กทอรี่ ~/.fonts
นำฟอน์ทที่ copy มาวางไว้ที่ ~/.fonts
เป็นอันเสร็จ
สร้าง public_html ใน Ubuntu 12.04
Set ดังนี้
$ sudo a2enmod userdir

$ sudo service apache2 restart

$ mkdir ~/public_html && chmod 755 ~/public_html
เรียกใช้งานได้ดังนี้
http://localhost/~jack/
ตอนนี้สามารถเรียกใช้ไฟล์ html ได้แล้ว แต่ยังไม่สามารถใช้งาน php ได้ เพราะโดย default แล้วจะไม่สามารถใช้งานได้เนื่องจากเรื่องของความปลอดภัย แต่สามารถแก้ไขให้ใช้งานได้ดังนี้
เปิดไฟล์ php5.conf
|
1 |
<strong>sudo nano /etc/apache2/mods-available/php5.conf</strong> |
comment out บรรทัด php_admin_value engine Off
Before:
|
1 2 3 4 5 6 7 |
<strong>…</strong> <strong> <IfModule mod_userdir.c></strong> <strong> <Directory /home/*/public_html></strong> <strong> php_admin_value engine Off</strong> <strong> </Directory></strong> <strong> </IfModule></strong> <strong> …</strong> |
After:
|
1 2 3 4 5 6 7 |
<strong>…</strong> <strong> <IfModule mod_userdir.c></strong> <strong> <Directory /home/*/public_html></strong> <strong> # php_admin_value engine Off</strong> <strong> </Directory></strong> <strong> </IfModule></strong> <strong> …</strong> |
Save and exit, then reload apache2 configuration with following commad:
|
1 |
<strong>sudo /etc/init.d/apache2 reload</strong> |
To testing PHP script work or not in the public_html directory, you can create some php script. In this case we are usingphpinfo, in terminal type following command
|
1 |
<strong>echo '<?php phpinfo(); ?>' > ~/public_html/info.php</strong> |
If you done, open the web browser then access http://[hostname]/~username/info.php.
")
Link Reference :
Ref: How to Enable and Configure Apache2 userdir Module in Ubuntu Server 12.04
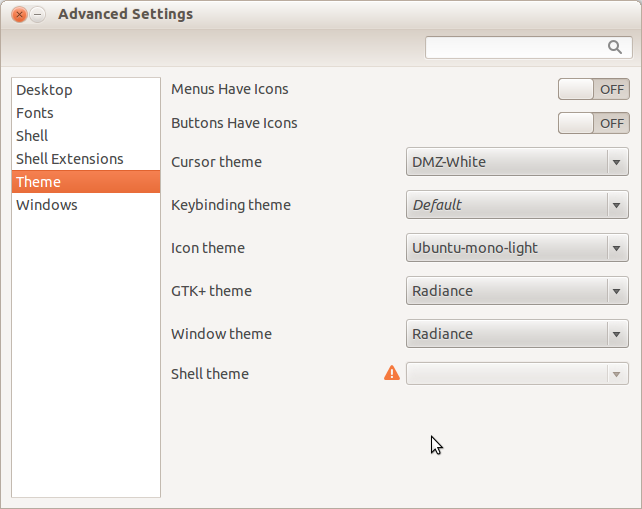
การปรับแต่ง Theme ใน Ubuntu 12.04
ติดตั้ง GNOME Tweak Tool
GNOME TWEAK TOOL IN UBUNTU 12.04: Install Gnome Tweak Tool in Ubuntu 12.04 Precise Pangolin
General tweaks (for both GNOME Shell and Unity)
Change themes, fonts and more with GNOME Tweak Tool
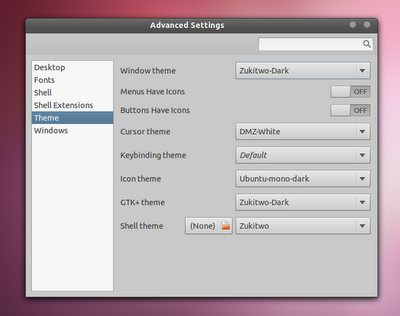
Features:
> Install and switch gnome-shell themes
> Switch gtk/icon/cursor themes
> Switch window manager themes
> Change
- The user-interface and titlebar fonts
- Icons in menus and buttons
- Behavior on laptop lid close
- Shell font size
- File manager desktop icons
- Titlebar click action
- Shell clock to show date
- Font hinting and antialiasing
To install:
- sudo apt-get install gnome-tweak-tool
When installation complete, GNOME Tweak Tool should show up as “Advanced Settings” in the menu. Besides changing fonts or themes, GNOME Tweak Tool can also be used to disable/enable GNOME Shell extensions, tweak the desktop, various windows behavior or GNOME Shell.
Ref: http://www.noobslab.com/2011/10/install-gnome-tweak-tool-in-ubuntu-1110.html
เรียกตรงได้ได้ด้วยคำสั่ง
$ gnome-tweak-tool
การดาวน์โหลดและติดตั้ง Themes
Download Themes ของ Ubuntu ได้ที่ http://gnome-look.org/
จากนั้น extract ไฟล์ที่ดาวน์โหลดมา แล้วนำมาไว้ที่ /usr/share/themes
เรียกใช้งาน gnome-tweak-tool
เลือก Theme ที่ต้องการ
GNOME Desktop
i’m loving it
หลังจากติดตั้งและใช้งาน package นี้ รู้สึกได้ถึงความรู้สึกเก่าๆ ตอนใช้ Gnome ครั้งแรกเลย
VirtualBox : VT-x features locked or unavailable in MSR ubuntu
VirtualBox หลังจากติดตั้งเสร็จ
อาการ
พอสั่ง start ให้ virtual matching ทำงาน จะเห็นจอดำเหมือนรันได้ แต่แล้วก็ฟ้อง VT-x features locked or unavailable in MSR ubuntu
พอปิด error ไป เครื่องจำลองก็ดับ
สาเหตุ
ไม่ได้เปิด nested paging (AMD-V) หรือ EPT (Intel VT-x) features ใน BIOS เครื่อง host
ทางแก้ไข
ที่เครื่อง host ให้ boot แล้วเข้า BIOS จากนั้นไป enable ก็จะหาย Error
Ref : ubuntuforums.org, virtualbox.org/
Favorite Eclipse shortcuts
ที่มา : codeofdoom.com/
Anyone who knows me knows that I hate touching the mouse. I do not like using it one bit. If there is a shortcut on the keyboard, its a pretty big guarantee I am going to do my best to find it. Being a programmer, I spend a massive amount of time using Eclipse. Naturally I have a pretty good understanding of all the shortcuts that make my life easier. Here a list of shortcuts that can help you. Also a brief how to on removing the most annoying shortcut of all, show in breadcrumbs.
Ctrl+space. Autocomplete.
This will recommend a list of classes they will fit what you have typed so far. If there is only one match, it will just print it out for you. After it does print it out for you, it will include the import for you. If something is ever missing the import at the top, I will just go to the Class declaration and just hit Ctrl+space.
Ctrl+Shift+R. Open resource.
I cannot live without this shortcut. It is such a time saver. Whenever you are trying to find a specific class, just start typing it and it will populate which classes match that criteria. Once you found it, select it and there you go! It also works great if you are new to a framework and need to find certain classes or if you partly recall the class name but not 100% sure.
Ctrl+O. Show inherited members.
This is another one that works great when you are working with classes with a massive lump of methods attached to it. You COULD do this within the Package Explorer, but no one likes touching that mouse! You can even type to filter down your methods. If you have methods with the same name and just different parameters, this also works great. Just type in part of the method name and get a few overview and access to each of the methods.
Ctrl+H. Loads search box.
I cant tell you how often this saves me. This isnt just a ‘find’ box, this does a ‘find in files’ within the File Search tab. Within here, you can specify what you are looking for in the files, what you file types you want to search in, etc. There are other types of search you can use, but I have not run into a case where I need them. Have you?
Ctrl+Shift+C. Comments a block of code.
This is perfect for debugging. It is strange because really when you think about it, you are only talking about having something put a /* at the begging of what you selected and a */ at the end of what you selected. However, I use this a lot more often than you would expect.
Ctrl+D. Delete a line.
Self explanatory. Extremely useful. If I didn’t have that, I’d have to waste time with Shift+End, Delete!.
Ctrl+E. Menu for opened files.
This will bring up a list of opened files that you have. Not only that, it will also allow you to type in your class names to narrow down your choices.
F4. Shows class hierarchy.
This is extremely useful when you are new to a with a massive framework and you really want to get a sense of how things are all connect, who extends what, etc. Unfortunately, this never made it into Flex Builder (bummer), but I enjoy life when I get to use it in Java land ![]() .
.
F3 and Ctrl+Left Mouse Click. Shows declaration.
I enjoy using this when I am working with larger files or anything with long methods (which always irks me). It can get extremely annoying to see where some variables are declared. All you have to do is high light the variable then hit F3. Sometimes I will hold control and hover over variable names if I am having a problem.
F5, F6, F7, F8. In debug mode.
There three shortcuts are probably used more than anything. I wanted to group them all into one section.
F5 – Step Into. When you are debugging an application and you come across a function call, F5 will step into that function and proceed from there.
F6 – Step. This allow you to debug line by line. However, this will not step into any functions.
F7 – Step out. If you are debugging in a function and you want to step out of it to where the function was called, this is what is used.
F8 – Skip to next breakpoint. If there arent any other break points to high, you will be just running the application until your application hits another breakpoint, taking you back into debug mode.
Alt+leftarrow or Alt+rightarrow. Jump back to a line, Jump forward to a line.
According to eclipse, this is “Next word, Previous word’. I am not sure what that means. All I know if I am stepping into functions, debugging through multiple files and breakpoints, this is a life saver. It allows me to retrace my steps, step by step. If I go back with Alt+leftarrow, I can go right back to where I was with Alt+rightarray.
Ctrl+Shift+L. Displays all shortcuts.
Self explanitory. Dig in and find your favorite!
This last one is not about using a shortcut. It is about what you have to do to turn it of.
Alt+Shift+B. Show in breadcrumb.
This is something that might work great for some people. For me, it annoys the hell out of me. It puts a breadcrumb in your text area and it does not give you an easy way to get rid of it. So here is how you get rid of Show in breadcrumb.
Go to Window then customize perspective. In there, go to the Commands tab. For me, I used the Java Editor Presentation. But on the Toolbars details, you should see Toggle Breadcrumb with an icon of a C and an arrow. Click on that then click okay. On your toolbar (if it wasnt already there), you should now see that icon. Click that to turn it off.
Just like any other trade, the better you know your tools, the better you will be. I am not saying this makes you a good programmer, but it does make you more efficient. If you feel I left out any shortcuts that find essential, feel free to comment!