Visual Studio Tools for Office เขียน VBA Excel ด้วย C# สำหรับ .NET programmer

VBA Excel ด้วย C# สำหรับ .NET programmer

สิ่งที่ต้องมีสำหรับการพัฒนา Excel Programming ด้วย C#

Visual Studio ที่ได้ติดตั้ง visual studio tool for office  ซึ่งจะให้เราสามารถสร้าง Microsof Office Project ได้จาก Visual Studio

vto 2005 sp1

vto 3

เครื่องคอมพิวเตอร์ที่ใช้งานได้ทำการติดตั้ง Microsoft Excel 2003 และทำการ update เป็น Service Pack 1

เมื่อได้ติดตั้งทุกอย่างเรียบร้อยแล้วก็เริ่มลงมือเขียน program กันได้เลยครับ

สร้าง project ใหม่

เริ่มเขียนคำสั่งในรูปแบบ code behine คล้ายๆ กับ Windows Form หรือ Web Form

run แบบไม่ต้อง debug ด้วยการกดปุ่ม ctrl + f5 workbook Microsoft Excel จะเปิดขึ้นมาและเรียกใช้งาน work book ที่เราได้เขียนคำสั่งไว้

ได้ผลลัพธ์ตามที่เราต้องการ

เปรียบเทียบกับการใช้งานกับการเขียนด้วย VB Script (VBA)

นี้เป็นความเห็นส่วนตัวของผมเองนะครับ

โดยส่วนตัวในแง่ของการเขียนคำสั่ง ชอบวิธีการของ Visual Studio For Office มากกว่า เพราะสามารถเขียนด้วยภาษา C# ซึ่งเป็นภาษาโปรดของผม และยังได้ความสามารถต่างของ Visual Studio มาช่วยในการเขียน program ได้ง่ายขึ้น เช่น intellisence หรือ auto complete อีกทั้ง c# ก็มี compiler ที่ฉลาดแสดงผลความผิดพลาดที่อ่านได้เข้าใจง่าย

แต่สิ่งที่การเขียนด้วย VBA ได้เปรียบกว่าคือ

เปิด workbook แล้วเรียกใช้คำสั่งที่เขียนเพิ่มเข้าไปได้เร็วกว่าวิธีของ VTO

copy ไปใช้ต่อได้ทันที่ ไม่ต้องทำการเปิด permission ให้กับ dll ที่ได้จากวิธีการของ vto

การพัฒนาหรือแก้ไขไม่จำเป็นต้องมี visual studio แค่เปิด file ด้วย excel ก็สามารถแก้ไขงานได้ทันที

หากต้องเลือกวิธีการใดวิธีการหนึ่งก็ trade off กันแล้วกันนะครับ

สำหรับคนที่เป็น VB อยู่แล้วก็อาจจะเลือก VBA

แต่สำหรับที่เป็น C# เขียน Excel programming ก็เป็นทางเลือกที่น่าสนใจ

tip

สำหรับผมคิดว่าสิ่งที่ยากที่สุดที่เจอในการเขียนก็คือ ขั้นตอนของการสร้าง project เพราะได้หาวิธีการแก้ไขหลายอย่างจนกว่าจะสร้าง project ใหม่ได้ จึงขอเขียนคำแนะนำเพิ่มเติมคือ

หากสร้าง project ไม่ได้

ให้ดูว่าเราได้ update office 2003 เป็น SP1 ยัง

ติดตั้ง VTO 2005 และ VTO 3 ยัง

หากยังสร้าง project ไม่ได้แนะนำให้ uninstall vto ทั้งสองตัวออกและติดตั้งใหม่

Ref: codesanook.com


ปัญหาเรื่อง Font ภาษาไทยในโปรแกรม Microsoft Office 2011

ปัญหาอ่านภาษาไทยใน Office for Mac ไม่ได้
แก้ไขได้โดยนำฟอนท์ที่ต้องการใช้เช่น Angsana New (จาก C:\Windows\Fonts) มาใส่ใน Mac OS X
โดยนำไปไว้ที่ Users > Home > Library > Fonts
ที่มา: https://www.macmuemai.com/forum/topic/6249

Office 2010: Freeze or lock rows and columns

Lock rows and columns by freezing panes
1. To lock rows, select the row below where you want the split to appear.
To lock columns, select the column to the right of where you want the split to appear.
To lock both rows and columns, click the cell below and to the right of where you want the split to appear.
2. On the View menu, click Freeze Panes.
3. To unlock rows, click Unfreeze Panes on the View menu.
ที่มา: Freeze or lock rows and columns

How to Create Table of Figures in Word 2007/2010

Step 1

Simply open your Word document, scroll down to the figure and select figure’s caption. Now, click on the arrow besides Change Styles, and select Heading style from options available suppose I selected Heading 5, in the same manner apply Heading 5 to all figure’s captions of your document

Step 2

Click on References menu > Insert Table of Figures

Following window will open, make here changes according to your requirement and click Options button

In this window select Heading 5 as Style and click OK and also close the previous screen

See Table of Figures is inserted in document

Update Table of Figures

In case if you insert or delete and figure in document then you also have to update table of figures, to do that simply select the table of figures you created and navigate to References menu > Update Table and that’s all.


ที่มา: trickyways.com

Microsoft Word 2010 Spacing

How To Modify Spacing Between Paragraphs

It is very easy to change the spacing before or after any particular paragraph or set of paragraphs. Simply select the paragraph(s) for which you are going to change the spacing and click on the Page Layout tab, here find the Paragraph group. Now choose the new spacing values in the form of points here.

ParagraphSpacing_thumb


How To Modify Spacing Between Lines

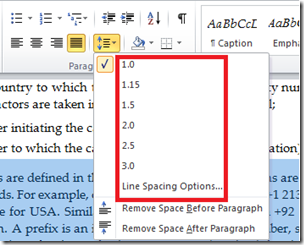
We have described the method of changing the space before and after the paragraph in the above section. Lets see how we can change the line spacing in your document. It is also very easy, click the Home menu and go to the Paragraph section here, and in the Line Spacing option, choose the new spacing that you need. You can double the line spacing by choosing 2 or triple it by choose 3 and so on.

LineSpacing_thumb

You can also remove spacing before or after the paragraph from this option. Enjoy!

ที่มา: addictivetips.com