unzip
เรียกใช้คำสั่ง unzip
[code]
unzip <filename>.zip
[/code]
unrar
ติดตั้ง package unrar
[code]
sudo apt-get install unrar
[/code]
เรียกใช้คำสั่ง unrar
[code]
unrar x <filename>.rar
[/code]
ที่มา: FileCompression, ubuntuforums.org
unzip
เรียกใช้คำสั่ง unzip
[code]
unzip <filename>.zip
[/code]
unrar
ติดตั้ง package unrar
[code]
sudo apt-get install unrar
[/code]
เรียกใช้คำสั่ง unrar
[code]
unrar x <filename>.rar
[/code]
ที่มา: FileCompression, ubuntuforums.org
Devhelp คือเครื่องมือช่วยค้นหา Document ใน Ubuntu สามารถทำการติดตั้งได้ดังนี้
sudo apt-get install devhelp
เวลาใช้งานก็เข้าไปที่
Applications → Programming → Devhelp
ที่มา: Programming
There are many development tools available for Ubuntu. A list of some of these is included below.
ปล. ก่อนจะ complie ได้ต้องทำการติดตั้ง build-essential package ซะก่อน
โปรแกรมการตัดคำภาษาไทยที่สามารถเลือกวิธี การตัดคำได้สองวิธี คือ การตัดคำแบบเลือกคำที่ยาวที่สุด(longest matching) และการตัดคำโดยเลือกแบบเหมือนมากที่สุด (maximal matching algorithms) ซึ่งนอกเหนือจากการใช้งานได้ดีกับข้อความที่เป็น text ธรรมดา โปรแกรมยังสามารถ รองรับไฟล์ในรูปแบบต่างๆ ได้แก่ html, rtf
ที่มา: โปรแกรมตัดคำภาษาไทย
การเรียกใช้ command line จาก Python สามารถเรียกได้โดยใช้คำสั่ง popen
import os
ipFile = “ip.txt”
opFile = “op.txt”
cmd = ‘swath <%s> %s’ % (ipFile, opFile)
f = os.popen(cmd)
หรือใช้ Popen
import subprocess
subprocess.Popen([r”gzip”,”-d”, “x.txt.gz”]).wait()
ที่มา: Subprocess management, Making System Calls in Perl and Python
การให้สิทธิใน MySQL ใช้คำสั่ง Grant เช่น
[code]
grant all on *.* to jack@localhost identified by ‘xxxx’;
[/code]
เป็นการให้สิทธิทั้งหมดแก่ user jack@localhost
แต่ถ้าต้องการให้สิทธิบางส่วนเช่น ให้สิทธิเฉพาะฐานข้อมูลที่กำหนดให้ใช้คำสั่ง
[code]
grant all on mydb.* to jack@localhost identified by ‘xxxx’;
[/code]
Link
การติดตั้ง Tesseract บน Ubuntu 10.04
ทำการติดตั้งด้วยคำสั่ง
sudo apt-get install tesseract-ocr-eng
ผลจากการใช้คำสั่งนี้ คือจะทำการติดตั้ง 2 packages คือ
tesseract-ocr 2.04-2 และ tesseract-ocr-eng 2.00-1
หลังจากติดตั้งเสร็จ ส่วนของ tessdata จะเก็บอยู่ที่ /usr/share/tesseract-ocr/tessdata
การใช้งานเบื้องต้น
ให้พิมพ์คำสั่งตามรูปแบบนี้ tesseract <path to tiff image> <output file> เช่น
$ tesseract input.tif output
จะได้ไฟล์ output ชื่อ output.txt โดย tesseract จะเติม .txt ให้อัตโนมัติ
การทดสอบ Tesseract
ได้ทำการทดสอบ tesseract ด้วยไฟล์รูปภาพจำนวน 3 ไฟล์ โดยไฟล์แรกเป็นตัวอักษร A-Z ผลลัพธ์ได้ถูกต้อง 100% ดังนี้
A B C D E
F G H I J
K L M N O
P Q R S T
U V W X Y
Z
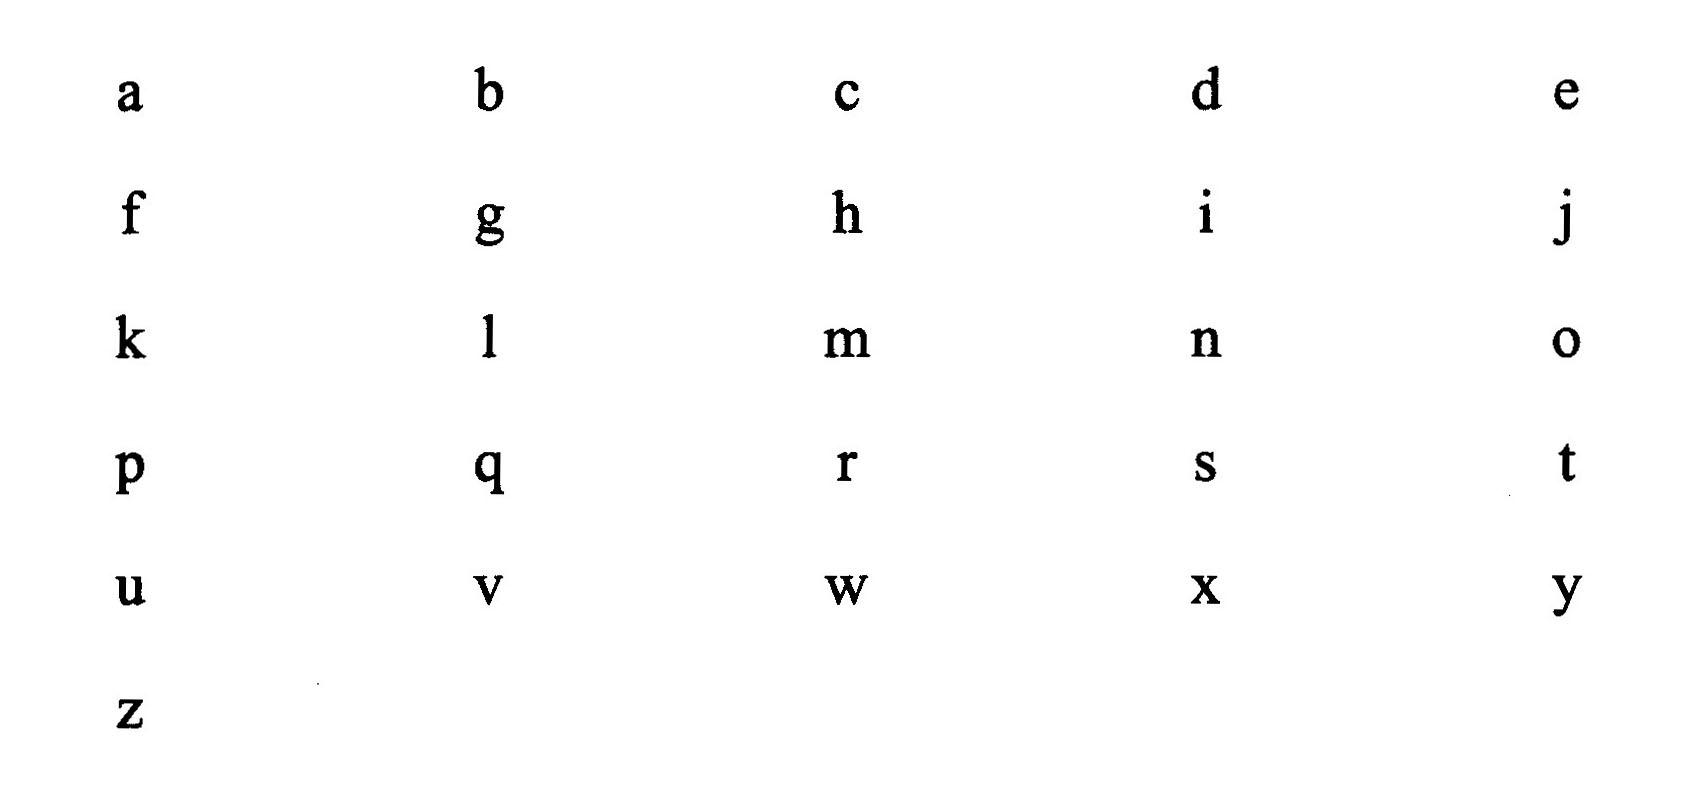
ไฟล์ที่สองเป็นตัวอักษร a-z ผลลัพธ์ได้ผิดพลาดไป 1 ตัว คือตัว z ดังนี้
a b c d c
f g h i j
k 1 m n 0
p q r s t
u v w x y
`
ไฟล์ที่สามเป็นตัวอักษร ก-ฮ ผลลัพธ์ได้ผิดพลาดไปทั้งหมด เนื่องจาก tesseract ยังไม่สนับสนุนภาษาไทย
D °I1 9 °JJ Q
‘1] il ‘1f **5 ill
Q! S] Q S °“
QI EM Y6] $1 0
14 1a u 11 1]
w nl w v~| n
ll El *5 E1 ’J
Fl EI H 14 W
B 8
ไฟล์ภาพที่ใช้ทดสอบสามารถดาว์นโหลดได้ ดังแสดงด้านล่างนี้
ที่มา: OCR – Optical Character Recognition, tesseract-ocr
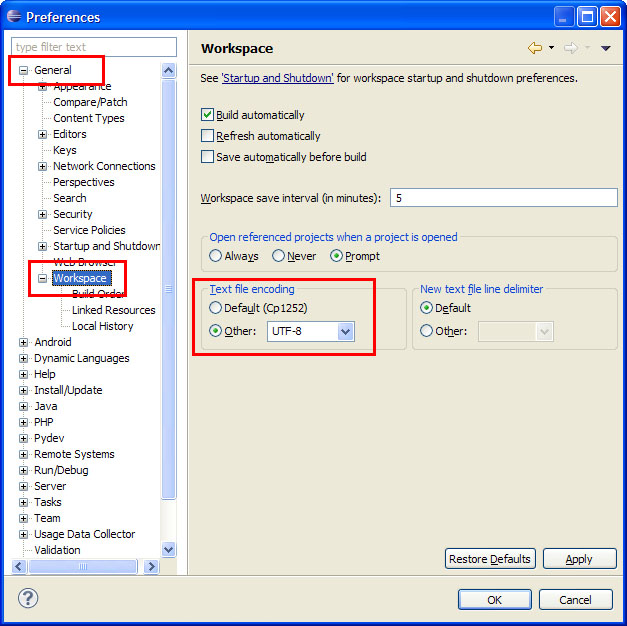
เมื่อทำการติดตั้ง Eclipse เรียบร้อยแล้ว จะสามารถใช้งานภาษาไทยใน Eclipse ได้ทันที แต่ถ้ามีปัญหาไม่สามารถใช้ได้ ให้ไปกำหนด Default Encoding ของ Eclipse ซะใหม่
โดยไปที่ Window > Preferences > General > Workspace แล้วทำการเปลี่ยน Text file encoding ดังรูป
ถ้าจะใช้ command ส่งเมลล์ ติดตั้ง Mail Transfer Agent ที่ชื่อ Postfix ก็พอ
https://help.ubuntu.com/11.04/serverguide/C/postfix.html
ที่มา: MailServer, Postfix
Postfix – using Telnet to test postfix
http://articles.slicehost.com/2008/8/6/postfix-using-telnet-to-test-postfix
ทำได้ 3 วิธีด้วยกัน