
http://www.xn--42cfif5cxctbu2bzdce3dwbzoued2g.com/
http://www.pantip.com/
Category Archives: Windows XP
Quad boot
- ใช้ Disk Utilities จัดเตรียม Partition ดังนี้
- /dev/hda2 MacOS
- /dev/hda3 Windows 7
- /dev/hda4 Windows XP
- /dev/hda5 Ubuntu
- /dev/hda6 Swap
- ติดตั้ง MacOS X
- ติดตั้ง rEFIt แล้ว Restart สัก 2 ครั้ง
- ติดตั้ง Ubuntu
- ติดตั้ง Windows 7
- ติดตั้ง Windows XP
- กู้คืน bootloader ของ Windows 7
- ติดตั้ง dual boot (Windows XP & Windows 7)
- กู้คืน GRUB2
Note: GRUB2 ติดตั้งที่ MBR, bootloader ของ Windows ติดตั้งที่ Partition ของ Windows 7
How to install Windows XP over Windows 7 in a dual boot ?
ติดตั้ง Windows 7 และ Windows XP ตัวเต็มในเครื่องเดียวกัน โดยสามารถเลือกได้ว่าจะใช้งาน OS ตัวไหน
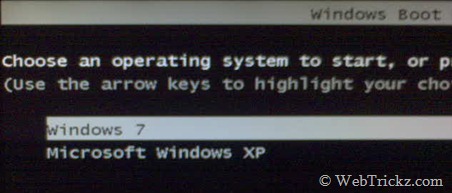
- Windows 7 บน Drive C
- Windows XP บน Drive D โดยหลังจาก Restart เครื่อง จะ boot เข้า Windows XP เพราะ bootloader ของ Windows XP ทำการเขียนทับ bootloader ของ Windows 7
- To restore Windows 7, you need to Boot from the Windows 7 DVD and “Repair your computer”
- After repairing, your system will restart and boot into Windows 7.
- Download and Install EasyBCD (2.0.2) on your Windows 7 to add boot entry for XP.
- Launch the program and select ‘Add New Entry’. Under “Operating Systems” open the Windows tab, select the Type as “Windows NT/2k/XP/2k3” and click on ‘Add Entry’.
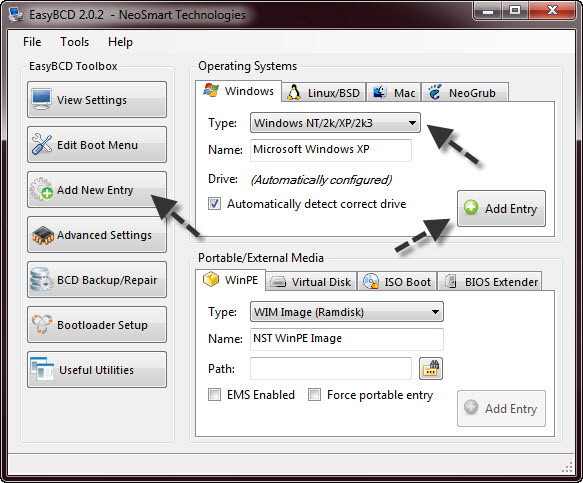
- The entry for Windows XP would be added instantly. You can choose the default OS to boot and modify the boot menu time-out from “Edit Boot Menu” option.
ที่มา: webtrickz.com/
วิธีแก้ปัญหา Windows XP ให้ปลอดจีนัส Genuine
ให้ไปดูที่ http://blog.phaisarn.com/node/116 ซึ่งแก้ไขเสร็จใน 3 ขั้นตอน
- ไปเปิด Windows Task Manager โดยการกด Ctrl+Alt+Del ครับ.
- จากนั้น ให้ทำการปิด Process ที่มีชื่อว่า wgatray.exe process ใน Task Manager ที่เปิดไว้
- แล้ว Restart Windows XP หนึ่งรอบ และขณะเดียวกันให้เข้า Safe Mode ครับ
- ตอนนี้เราอยู่ที่ Safe Mode ให้ไปลบไฟล์ ชื่อ WgaTray.exe ที่อยู่ในโฟลเดอร์ c:\Windows\System32 และ c:\Windows\System32\dllcache.
- หลังจากทำการลบไฟล์ทั้งสองเรียบร้อยแล้ว ให้ไปที่ Start > RUN และพิมพ์ RegEdit กด Enter
- จากนั้นให้ค้นหาโฟลเดอร์ที่ชื่อว่า HKEY_LOCAL_MACHINE\SOFTWARE\Microsoft WindowsNT\CurrentVersion\Winlogon\Notify
- หลังจากเจอแล้ว ให้ทำการลบโฟล์เดอร์ที่มีชื่อว่า WgaLogon และข้อมูลทั้งหมดที่อยู่ภายใต้โฟลเดอร์นี้ (ระวังจะลบไฟล?ผิด ครับ)
- เมื่อลบหมดแล้ว Restart เข้าใช้งานปกติ
Configure Windows XP to Automatically Login
You can use Registry Editor to add your log on information. To do this, follow these steps:
- Click Start, click Run, type regedit, and then click OK.
- Locate the following registry key:
HKEY_LOCAL_MACHINE\SOFTWARE\Microsoft\Windows NT\CurrentVersion\Winlogon
- Using your account name and password, double-click the DefaultUserName entry, type your user name, and then click OK.
- Double-click the DefaultPassword entry, type your password under the value data box, and then click OK.If there is no DefaultPassword value, create the value. To do this, follow these steps:
- In Registry Editor, click Edit, click New, and then click String Value.
- Type DefaultPassword as the value name, and then press ENTER.
- Double-click the newly created key, and then type your password in the Value Data box.
If no DefaultPassword string is specified, Windows XP automatically changes the value of the AutoAdminLogon registry key from 1 (true) to 0(false) to turn off the AutoAdminLogon feature.
- Double-click the AutoAdminLogon entry, type 1 in the Value Data box, and then click OK.If there is no AutoAdminLogon entry, create the entry. To do this, follow these steps:
- In Registry Editor, click Edit, click New, and then click String Value.
- Type AutoAdminLogon as the value name, and then press ENTER.
- Double-click the newly created key, and then type 1 in the Value Data box.
- Quit Registry Editor.
- Click Start, click Restart, and then click OK.
After your computer restarts and Windows XP starts, you can log on automatically.
ที่มา: support.microsoft.com/
ติดตั้ง Epydoc บน Windows XP
ดาวน์โหลด และติดตั้ง Epydoc
ดาวน์โหลด Epydoc จาก http://sourceforge.net/projects/epydoc/files/
จะได้ไฟล์ epydoc-3.0.1.win32.exe
ให้ทำการ Double click เพื่อทำการติดตั้ง
หลังจากติดตั้ง Epydoc แล้วจะได้ไฟล์มา 2ไฟล์ ให้ใชงานอยู่ในโฟลเดอร์ C:\Python25\Scripts
- epydoc.pyw มี GUI ให้ใช้
- epydoc.py สำหรับการใช้งานแบบ command line
การใช้งาน Epydoc
http://epydoc.sourceforge.net/using.html
ที่มา Epydoc
Windows XP: วิธีลบ Windows Genuine Advantage ออกจากเครื่อง
แก้ไขได้ใน 3 ขึ้นตอน
- กด start (มุมล่างซ้าย) –> run –> regedit.exe
- แล้วไปตามนี้ HKEY_LOCAL_MACHINE\SOFTWARE\Microsoft\Windows NT\CurrentVersion\Winlogon\Notify
- พอถึงตรงนี้หา folder ที่ชื่อว่า WgaLogon ลบทิ้ง(คลิ๊กขวาที่ไฟล์แล้วกดDELETE)
ที่มา: www.gunsandgames.com/