
http://lifehacker.com/5894838/customize-your-windows-installation-to-create-the-os-of-your-dreams
Category Archives: Windows
How to Create ISO from Mac Installation DVD – Rip Mac DVD in Windows
Several methods showed in this blog to install Mac OS X on Windows OS with Desktop Virtualization, original Mac installation DVD does not work sometimes with these methods. You must create ISO file from installation disk and use. This post shows how to create ISO from Mac Installation DVD in Windows.
I tried my favorite DVD writing software to Rip Mac DVD to ISO in Windows, but those images did not work with VMware or VirtualBox. Finally, Imgburn did the job and it worked well.
Follow these steps to rip Mac DVD in Windows
1) Get the Snow Leopard DVD here and Download and install Imgburn burning software. ( Free version, registration not required)
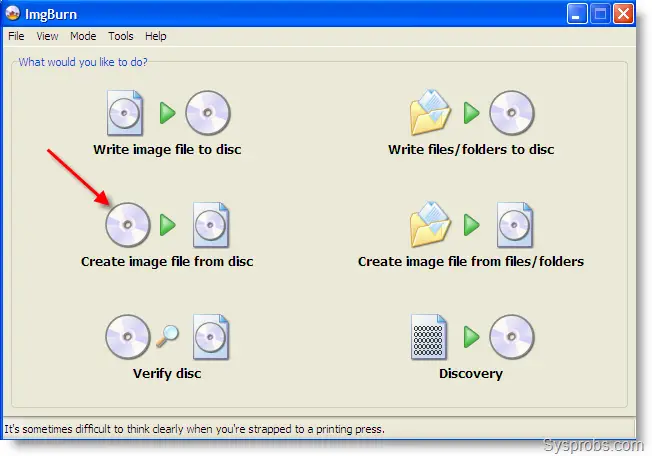
2) Start program and select image file from disk option. Do not close log screen down, better keep it.
3) Next screen will detect the DVD information and output file location. Make sure to select correct source destination. Its better to reduce data reading speed to 1x ( I know it will be slow) for this conversion. Then start.

4) Progress bar will show the status. I’m sure it will end without any errors if the physical drive and disk have no damages.
Ref: www.sysprobs.com/create-iso-mac-installation-dvd-rip-mac-dvd-windows
How to Confirm Virtualization Technology is Enabled or Disabled?
Download Intel tool to confirm virtualization technology
http://downloadcenter.intel.com/Detail_Desc.aspx?ProductID=1881&DwnldID=7838&lang=eng&iid=dc_rss
The result of this utility brings a screen as shown below,

Ref: http://www.sysprobs.com/disable-enable-virtualization-technology-bios
วิธีการแก้ไข Install ActiveX Control ไม่ได้
กรณี install activex control แล้วขึ้นหน้าต่างมีข้อความว่า
Windows has blocked this software because it can’t verify the publisher.
Name: xxxx.CAB
Pubisher: Unknown Publisher
ให้แก้โดยการไปเซ็ตของ IE ดังขั้นตอนต่อไปนี้
- ไปที่ Tools -> Internet Options
- เลือกแท็บ Security -> Custom level…http://s0.wp.com/wp-content/themes/pub/mistylook/img/shadow.gif); background-attachment: initial; background-origin: initial; background-clip: initial; background-color: initial; border-right-style: none; border-bottom-style: none; border-width: initial; border-color: initial; border-top-color: rgb(238, 238, 238); border-top-width: 1px; border-top-style: solid; border-left-color: rgb(238, 238, 238); border-left-width: 1px; border-left-style: solid; background-position: 100% 100%; background-repeat: no-repeat no-repeat; ” alt=”” src=”http://tspy.wordpress.com/wp-admin/” />http://s0.wp.com/wp-content/themes/pub/mistylook/img/shadow.gif); background-attachment: initial; background-origin: initial; background-clip: initial; background-color: initial; border-right-style: none; border-bottom-style: none; border-width: initial; border-color: initial; border-top-color: rgb(238, 238, 238); border-top-width: 1px; border-top-style: solid; border-left-color: rgb(238, 238, 238); border-left-width: 1px; border-left-style: solid; background-position: 100% 100%; background-repeat: no-repeat no-repeat; ” src=”http://tspy.files.wordpress.com/2008/01/step2.gif?w=500″ />
- เลื่อน scroll bar ในส่วนของ setting หาในส่วนของ ActiveX controls ที่หัวข้อว่า Download unsigned ActiveX controls ให้เลือก Promthttp://s0.wp.com/wp-content/themes/pub/mistylook/img/shadow.gif); background-attachment: initial; background-origin: initial; background-clip: initial; background-color: initial; border-right-style: none; border-bottom-style: none; border-width: initial; border-color: initial; border-top-color: rgb(238, 238, 238); border-top-width: 1px; border-top-style: solid; border-left-color: rgb(238, 238, 238); border-left-width: 1px; border-left-style: solid; background-position: 100% 100%; background-repeat: no-repeat no-repeat; ” src=”http://tspy.files.wordpress.com/2008/01/step3.gif?w=500″ />
- click OK
- จะขึ้นหน้าต่างเพื่อยืนยันการ setting ให้คลิก Yes
- จากนั้นคลิก OK
- จะแสดงหน้าต่างให้ Restart windows ก็ให้ Restart Now
- เมื่อรีบูทต์เครื่องเสร็จเรียบร้อย ก็ให้เข้าเว็บนั้นใหม่ ทีนี้ก็จะ install activex controls ได้
ที่มา: http://tspy.wordpress.com